Wednesday, April 27, 2011

Cooking With Cricut: Spring Flowers

Happy Wednesday!  Our challenge this week at Cooking With Cricut was to use Spring flowers on our project -- daffodils, tulips, dandelions, etc.  After all, April showers bring May flowers!  I decided to create the topper for my May calendar.  (Click on the month to see toppers for March and April.)


I used Walk in My Garden and Cindy Loo cartridges for this project.  All of the paper is from my paper scraps stash except for the 12 x 12 background piece -- it is from a Bazzill paper pack I purchased at Michael's.

Walk in My Garden:
  • Watering can -- cut at 4 1/2" tall.
  • Gardening tools -- cut at 3 3/4" tall.
  • Daffodils -- cut at 4" tall.
  • Bleeding Heart -- cut at 2 5/8" tall.
  • Tulips -- cut at 4 1/4" tall.
  • Hyacinth -- cut at 4 1/4" tall.
  • Turtle -- cut at 2 7/8" tall.
  • Snail -- cut at 3/8" tall.
Cindy Loo:
  • Text -- cut at 2 1/4" tall.
The dragonflies are dimensional stickers by Jolee's and the butterfly is a Grand Adhesions sticker by Tim Coffey for K & Co.  A little chalk and some pen stitching added the finishing touches.

I hope that maybe I've inspired you to link up your own Spring flowers project at Cooking With Cricut -- who knows . . . you might be this week's Top Chef!   Remember:
  • You must use your Cricut or some type of die cut on your project.
  • Your Project must be a new project for this challenge and your post MUST have a link back to CWC.
  • Your entry needs to be a direct link to your project and not just your blog.
I can't wait to see what you've created. Leave me a comment and your blog address so I can come over and take a peek at what you're cooking up!

Please hop over to Cooking With Cricut and see what the rest of the Design Team has whipped up for your viewing pleasure!

~ Jen

Sunday, April 24, 2011

Easter Onesies for my little peeps!

Our family has been blessed with the birth of several babies this year.  Two in January and one in February.  And our grandson is going to be ONE in a week!  I knew I wanted to give the little one's something for Easter -- they obviously can't have candy like their older siblings and cousins!  So I made them each a special onesie.
 
This is Brayden ~ he is 2 1/2 months old.

This is Kylie ~ she is 3 1/2 months old.


Their onesies feature the chick and egg from Create-A-Critter -- sized to fit each onesie.  Kylie's is a 0-3 month size and Brayden's is a 3-6 month.  I used the freezer paper method and Tulip brand soft fabric paints.

Dylan's onesie features the bunny and carrot from Create-A-Critter sized to fit his 12 month sized onesie.  Same method and paints as the others.


I know I'm biased -- but isn't he just the cutest little guy!!  He had the best time hamming it up for Gramma and her camera.  He loves to see himself on the digital camera screen.

I hope you and your peeps had a glorious Easter!

~ Jen 

Wednesday, April 20, 2011

Cooking With Cricut Challenge: Easter

Here comes Peter Cottontail . . . hopping down the bunny trail  . . . hippity-hoppity, Easter's on its way!

Happy Wednesday and welcome to challenge day at Cooking With Cricut.  Our esteemed Executive Chef, Melin, challenged the Design Team to whip up some Easter goodies for your viewing pleasure!  And we hope that you might be inspired to link up your Easter projects at Cooking With Cricut -- who knows . . . you might be this week's Top Chef!  Remember:
  • You must use your Cricut or some type of die cut on your project.  
  • Your Project must be a new project for this challenge and your post MUST have a link back to CWC. 
  • Your entry needs to be a direct link to your project and not just your blog.
My project this week features Easter cards for my daughter, grandson, two nieces and nephew.

Our youngest daughter loves bunnies.  She has two Build-A-Bear rabbits named Max and Ruby, after her favorite cartoon and books as a pre-schooler "Max and Ruby" by Rosemary Wells.  (Shh!  Don't tell anyone, but even now -- as a seven year old, she still loves "Max and Ruby" cartoons and books.)  So a bunny card was a must!

This little brown bunny was created using Cricut Design Studio and the Create-A-Critter cartridge.  I welded two bunnies together to create a side fold card.  The bunny measures 5 1/4" tall and the carrot is 2 1/4" tall.  Some pen stitching, a little chalk, and a white pom-pom for a tail complete this card. 


The next four cards are for the three and under crowd -- nieces, Layla (3) and Lexie (2); nephew, Evan (3 mos.) and grandson, Dylan (11 mos.).  The eggs are cut at 5 1/4" tall from the Easter 2010 cartridge.  The banner is from the Wedding cartridge and is cut at 3 1/4" wide.  All of the surprises inside the eggs are from Create-A-Critter and are cut at 3 1/2" tall.


I cut two eggs for each card.  The front of the card I hand cut the zig-zag to resemble a cracked egg.  Then I glued the bottom front to the back -- just around the outside edges to create a pocket for the little critters to slide in to. 

Three of the egg tops were hinged to swing open with a mini-brad.  The fourth is a "pull me" -- the egg top is adhered to the top of the duckling's  head.  The Easter greetings are on the back of the cute little critters.

I hope you have enjoyed my Easter projects and I can't wait to see what you've created.  Leave me a comment and your blog address so I can come over and take a peek at what you're cooking up!

Please hop over to Cooking With Cricut and see what the rest of the Design Team has whipped up for your viewing pleasure.  Happy Easter!

~ Jen

Saturday, April 16, 2011

A Secret Garden Birthday Party

Our daughter turned seven recently ~ her birthday always falls during our public school's Spring Break.  Therefore, her friends are usually out of town and we end up having two  birthday parties.  This year was no different!

The house we live in belongs to my Mom, who is an amazing gardener.  The green thumb, however, skipped my generation!  The backyard is lush and full of plants.  It has a beautiful wooden arbor over the patio and the property backs up to an Audubon Preserve.  The front of the house is beautifully landscaped and planted.  And down one side of the house is a path through an arched trellis (with roses growing on it), under beautiful plum trees and past a tree covered in blooming jasmine.  So it was the perfect location for a "Secret Garden" birthday party.

For those of you not familiar with The Secret Garden . . . it is a wonderful piece of children's literature written by Frances Hodgson Burnett.  It is set in England and is about a young orphaned girl sent to live with her uncle.  She is alone most of the time, with only servants for company.  She discovers a locked "hidden" garden on the estate and is shown the way in by a robin redbreast.  She brings the garden, and subsequently her sickly cousin, back to life.

So for the party invitation I knew I wanted a locked gate with a bird.  After using Cricut Search.com to find a "gate" I determined that the one I was looking for did not exist on a cartridge I own.  Isn't that the way it is!  So I got creative and made my own using Cricut Design Studio and the following cartridges:  Tags, Bags, Boxes & More (TBBM), Disney Pooh Font, and George & Basic Shapes. 

I constructed my base card by welding two tags from TBBM.  I then laid out my gate with the capital letter "I" from the wooden letters on Pooh Font cartridge and overlaid the same arched top tag.  The lock was created using the rounded-corner rectangle from the George cartridge as was the keyhole -- I made it using a small circle and a rectangle. 


The bird is from the Create-A-Critter cartridge -- and I know . . . this is not a robin.  However, the brown robin just didn't stand out against the brown gate so I improvised!  The ivy is from Paper Doll Dress Up.

I stamped an antique key on the envelope flap with a russet brown stamp pad.  The envelope looked like it had been made with old parchment paper.

The card base is ivory card stock and measures 5 1/2" x 4 1/4".  The gate is Bazzill Basics brown; the ivy is also a Bazzill paper and was stippled brushed with an evergreen stamp ink; the bird is cut from two shades of Bazzill and I used chalk on his chest.  The lock was cut from a metallic gold paper I've had for forever.

Party decorations were pretty simple - a banner, two centerpieces, a butterfly "chandelier" and some tissue paper pom-pom flowers (that we ended up not hanging) that I made; and paper lanterns from the $1 store.


The banner was made using Create-A-Critter and Plantin Schoolbook.  It is hard to see in this photo but there is a bee, butterfly and ladybug used as spacers.  The flowers were cut at 5 1/2" and the letters are about 2 1/2" tall.   The tissue paper pom-pom flower directions came from the Martha Stewart website -- I did add extra paper to make them fuller.  The flower pot centerpieces are painted paper mache pots, ribbon around the top, and have glittered tulips, butterflies and paper grass purchased at the $1 store.  The butterfly "chandelier" was created using an embroidery hoop that I covered with satin ribbon, sheer wire ribbon, $1 store butterflies, some flowers left over from a scrapbook project and hot glue.


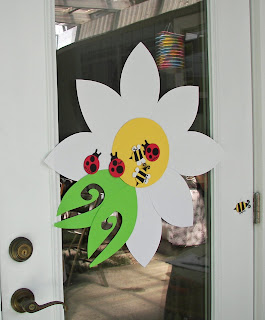
One of the games the girls played was "Pin the Bug on the Flower."   I created a huge daisy using my Cricut as well as ladybugs and bees for each girl.  The flower was cut using the Create-A-Critter cartridge.  The petals measured 8 1/2" and the center was approximately 8".  The leaves are from the Walk In My Garden (WIMG) cartridge and measure about 10 1/2" wide.  The bees and ladybugs are also from WIMG are about 2 3/4" tall. 

They loved it and played it several times!  Scented bubbles were our game prizes.

And of course, we had cake!  Dee made a beautiful flower cake and cupcakes! 

The daisy cake is her signature chocolate cake covered in buttercream.  The cupcakes were white cake also decorated with buttercream. 

The bees and ladybugs are made from fondant.  And the sign in the center of the cake was cut from white card stock using the WIMG cartridge.

To say that the party favors were a hit is an understatement!  We created a "Sweet Shop" for Demi and her friends. 

I made a sign using the following cartridges and tons of glitter:  Cindy Loo, Mickey font and Create-A-Critter.  The basket tags are made using the scalloped oval on the Pink Journey cartridge. 

The little bags, the flower embellishments and the baskets (two for $1) all came from the $1 store.  I also made lollipop flowers using the flower from the Plantin Schoolbook cartridge.

The girls had the following sweet treats to fill their bags with:  gumballs, jawbreakers, starburst, smarties, sixlets, pixie sticks, tootsie rolls, candy bracelets and two different kinds of lollipops! 

I always make the little girls in my life special shirts and tutus for their birthdays.  However, Demi told me early on that she was getting too old to wear tutus in public -- they're OK for dress-up at home, but not to wear in front of her friends.  So I made her a special shirt to wear using the freezer paper method and the following cartridges:  Create-A-Critter (tulips) and Pooh & Friends (bee and butterfly).

Thanks so much for taking the time to see all of the things created for our daughter's Secret Garden Birthday Party.  It was fun, simple and inexpensive.  Parties don't have to cost a small fortune or be super elaborate to be special.  Demi declared at the end of the party that this was her best, most-special and wonderful birthday ever!

Side note: I love this picture! Demi's expression tells so much about her -- she cracks us up on a regular basis and she is full of fun, energy, life and surprises.

~ Jen

P.S.  Getting a little more "bang for my buck" ~ the butterfly chandelier and the pom-pom flowers were made not only for the party, but to hang in Demi's room later.  The two flower pot centerpieces are currently on my buffet as part of my Easter/Spring decorations -- I have used these flower pots for numerous parties by just changing out the ribbon and the contents of the pot!  The little pink baskets will get put to use in my craft room and for other parties.

Wednesday, April 13, 2011

Cooking With Cricut: There's Cash in Your Stash!

Our challenge this week at Cooking With Cricut, in honor of the dreaded Tax Day on April 15, is to use something from our stash that is over one year old or to use money in or on our project somewhere.  Noooo problem!  I use my stash all the time!!!

I created a card for our youngest daughter's seventh birthday.  She had a "Secret Garden" themed party and I just happened to have some left over die cuts from our older daughter's baby shower last April.  The ribbon (flower stem) is left over from a wedding invitation I created two years ago for a friend.  The only thing new on this card is the poem I wrote for my baby girl! 

(Disclaimer:  I do not claim to be a poet.  Read at your own risk!)

The card base is a pale green Bazzill card stock.  The mat is from DCWV Nana's Nursery:  Baby Girl paper pack  The flower, leaf and bee were cut using the Walk in My Garden cartridge.

The poem is printed on a mat cut from "Just Because" Cards cartridge.

So check out your craft storage and see what kind of "old" stuff you've got lying about that you can use.  Link your project up at Cooking With Cricut and maybe you'll be one of this week's Top Chefs!

Thanks for stopping by -- make sure you pop on over to Cooking With Cricut and see what my fellow Chefs have whipped up for your viewing pleasure!

~ Jen

Monday, April 11, 2011

Thank You & Blog Candy Winner

Thank you to everyone for all of your wonderful comments and feedback on my Easter-inspired projects during the Cooking With Cricut Bunny Hop on Saturday!  I read each and every one of them!  And I have enjoyed going and taking a look at the new follower's blogs (if you have one).  Boy, oh boy, are you ladies talented!!  It was also fun to see everyone's answers about their favorite Easter treats -- Chocolate Bunnies, Chocolate Eggs, Cadbury Eggs (regular and caramel) , Jelly Beans and Peeps were the top five faves!  I personally love the Cadbury Robin's Eggs . . . crunchy outside, yummy chocolate inside.

I finally got to take my hop down the bunny trail late Saturday evening.  And I  have to tell you . . . I am truly honored to be a part of such a talented group of women!  You gals rocked the challenge and posted some beautiful projects.

The reason I was sooooo late in hopping is . . . our baby just turned seven.  SEVEN!  It's so hard to believe that she could possible be that old already!  Anyway, her birthday always falls during our school system's Spring Break and her friends are usually out of town with their families.  So we held her "girlfriend" party the weekend after her birthday, which was this past weekend.  So while you all were hopping along, we were preparing a "Secret Garden" birthday party and then hosting nine giggling little girls and their mommies.  Everyone had so much fun ~ and our daughter declared it the best birthday EVER!  I'll have pictures up soon of the amazing cake Dee made and all of the Cricut-y projects I created for the event.

One last thank you . . . Glenda at Glenda's Cards has honored me with The Versatile Blogger Award.  Thank you so much, Glenda ~ I truly appreciate your kindness and generosity!  Please be sure to go over to Glenda's blog and check our her beautiful and inspirational work.

The rules after receiving the award are:

1. Thank the person who sent it to you.
2. Tell seven things about yourself.
3. Send this award on to 15 bloggers.  (I'm passing it on to ten.)

Seven things about me . . .
  1. I am at the halfway mark between 40 and 50 (for a couple more months, anyway).
  2. I was born and raised in Gainesville, Florida, as was my grandfather and my mother. 
  3. I am the mother of four adopted children, who range in age from 29 to 7.
  4. In 1999, I was lucky enough to have met my soul mate and we just celebrated ten amazing years together.
  5. I have had two carpal tunnel surgeries on my right hand and one on my left (typing 130+ correct words per minute for too many years is not good for your wrists!)
  6. In my "previous life" (see #5) I was a word processor, desktop publisher/typesetter, web site designer, and facilities coordinator for a 3000+ member church.
  7. I am blessed with an abundance of nieces and nephews and one sweet grandson who will celebrate his first birthday on May 1st.
So the award goes to . . . . my fellow Cooking With Cricut Design Team members for an amazing blog hop!

Roberta - TX Scrapper Mom
Dalis - Stamper Girl

And to Karla who had to pull out at the last minute due to a family emergency ~

And now, the moment you've all been waiting for . . . .

The blog hop winner of the beautiful digi-stamp from Melin at Cooking With Cricut & Paper Crafting World, as chosen by random.org is . . . . (drum roll, please!) . . .

#60 Jessica said . . .  Love the boxes! And the idea to not hide the chocolate inside the eggs. We're in hot Houston, so that's a great tip, too. Your egg hunt participants are going to love these!

Congratulations, Jessica!  Please send me an e-mail (jlhudson2 at cox dot net) so that I may send your digi-stamp via return e-mail.

Don't forget to stop back by Wednesday morning to see what I've whipped up for this week's Cooking With Cricut challenge!

Hugs!

~ Jen


Saturday, April 9, 2011

Cooking With Cricut Bunny Hop!

~ Comments have now closed.  Thanks for hopping with us! ~

Welcome to the CookingWithCricut.com Bunny Hop!

With Easter just around the corner we wanted to share some of our ideas and give you some inspiration for your Easter projects! If you've come from visiting Jean at Jean's Crafty Corner, you're in the right place! If you've just happened across my blog and would like to hop along with us, you can go to CookingWithCricut.com and start at the beginning. (Go HERE.)

Put on your bunny ears, grab some jelly beans and/or chocolate eggs and let's craft!


My first project features a tin pail purchased at Target for $1.  They have some of the cutest tins in their Dollar Spot! 

The bunny is from Create-A-Critter and is cut at 5" tall.  I attached him to the inside of the bucket with some strong adhesive tape -- his bottom half is in the bucket, his arms are resting on the outside of the bucket. 

A little chalk, some pen doodling and Easter grass and he's all ready to be filled with yummy treats!


Next up . . . a card!  This cute little chick was cut using the Easter 2010 cartridge.  Using the Cricut Design Studio, I welded two chicks together at the top of their little heads to create my white card stock card base. 

Then I cut a single chick out of yellow and his beak is a scrap from a DCWV Mediterranean paper pack.  I glued the yellow to my card base, drew on some eyes, inked the edges with a marigold stamp pad and added some rosy cheeks with chalk.

The inside of the card reads:  Happy Easter to our favorite little chick! 


And last, but not least, some cute little favor boxes for our traditional Easter Egg Hunt at my Mom's.  Instead of filling 80 plastic eggs with candy (it always melts), Mom hides a gold egg (with all the others) for each child, which they turn in for a special treat after brunch/lunch. 

The credit for these cute little boxes goes to Jen Wuthrich.  I made a few modifications and scaled them down in size a bit. 
   
The box (popcorn box) is from the  Tags, Bags, Boxes & More cartridge and is cut at 3 3/4" tall.  The bunny is from the Doodlecharms cartridge and is cut at approx. 2 1/2" tall (shadow).  Again, some chalk and pen doodling add the finishing touches.  The paper for the boxes is from DCWV Nana's Nursery:  Baby Girl paper pack.  I used my Crop-A-Dile to punch a hole through the ribbon and box and then added a small brad.  On the back of the box is a small pom-pom bunny tail attached with a glue dot.

Now it's your turn! Link up your Easter-related project at CookingWithCricut.com. Be sure to include a Cricut or other die cut machine cut on your project. The Design Team will pick their three favorites and one lucky person will be chosen randomly to win one of the prize packages being offered in this hop.


BLOG CANDY!

The talented and generous Melin has given me this super cute  digi stamps to give away to one lucky blog hop participant.  To be eiligible to win you must do two things:
  1. Be a follower of my blog.  
  2. Leave me a comment and answer this question . . . "My favorite Easter treat is . . ."

I hope you enjoyed my projects and perhaps gathered some inspiration for your own Easter treats!  Now get hopping . . . your next stop is with Stacey at Stacey's Creative Corner!

If you lose your way, here are the stopping points on the hop . . .

  1. Jennifer - Musings of A Crafty Mom (You're here!)
  2. Stacey - Stacey's Creative Corner (Your next stop in the hop!)
  3. Roberta - TX Scrapper Mom
  4. Dalis - Stamper Girl

Friday, April 8, 2011

Tomorrow, tomorrow . . . It's only a day away!


The Cooking With Cricut Bunny Hop is tomorrow!  Don't miss out!  Join us at 9:00 a.m. (EST) for this Easter-inspired blog hop sponsored by Melin at Cooking with Cricut.  There will be prizes and beautiful projects for you to see. 

Mark your calendar and set your alarm clock -- you won't want to miss this one!

Wednesday, April 6, 2011

Cooking With Cricut Challenge: April Showers

Happy Wednesday!  The challenge this week at Cooking With Cricut is April Showers -- anything with rain or water as the focus.  Which is appropriate since it rained here most of last week.  As you may remember, I decided to make a perpetual calendar for 2011.  If you don't remember, you missed it or if you're new to my blog here is the link to my March calendar topper.  Well, I decided not to wait until the end of the month this time to create my topper . . . so here is April!  (Don't forget, you can click on the image to make it larger.)


I am a huge lover of Winne the Pooh (classic or Disney) and all of his pals!  In one of A. A. Milne's books, Christopher Robin is in the Hundred Acre Wood during a downpour with Pooh Bear -- so this is a bit of a play on my memory of that story.   And since there are no images of Christopher Robin on either of the Pooh cartridges, I created him using the Everyday Paper Dolls cartridge. 

No 12 x 12 paper was harmed in the creation of this project  -- with the exception of the base 12 x 12 sheet, everything else came from my scrap stash!  The solid card stock is either Bazzill or Recollections and the plaid (Christopher Robin's shorts) is from an old K & Co. paper pack.  I used the following cartridges for this project:

Cindy Loo -- "April" text cut at 2" tall.

Pooh & Friends -- Clouds cut at 2 5/8" tall; Raindrops cut at 1 1/8" tall; Sun cut at 2 1/4" tall; Bridge cut at 7 1/2" wide; Pooh cut at 4" tall; and Piglet cut at 3"tall.

Everyday Paper Dolls -- Christopher Robin cut at 5" tall (all clothing and accessories cut to fit); Umbrella cut at 3 1/2" tall; and the grass was cut at 2" tall and 11 3/8" wide.

Animal Kingdom -- Duck cut at 1 1/2" tall.

A little chalk, a little ink on edges, some pen detailing and viola!  Quite possibly one of the cutest things I've ever made for myself!  I say that because I'm one of those crafters who always gives everything away as gifts.  I have very few actual examples of my hours of crafting -- tons of photos, but not too many things you can actually hold in your own two hands!

Please hop on over to Cooking With Cricut and check out what the amazing Design Team Chefs have whipped up for your viewing pleasure!  I hope you'll be inspired to create your own "April Showers" project and link it up at CWC-- you could be our next Top Chef!

And don't forget!  This Saturday, April 9th is our one-day Bunny Hop.   Our Design Team Chefs are busy cooking up some yummy treats to inspire you and get your creative juices flowing for all things Easter-related.   Come join us!

~ Jen

Tuesday, April 5, 2011

A Buggy Birthday Cake!

Check out this awesome cake Dee made for Demi's 7th birthday!  It is three tiers -- a chocolate, a white and a funfetti -- covered in the yummiest buttercream and decorated with fondant accents. 


I made all of the ladybugs, bees and caterpillars from fondant and then "painted" them with a mixture of ice colorant and vodka.  (Yes, vodka!  Don't worry, the alcohol evaporates!)  Dee cut out and formed the flowers, leaves and butterflies.  I added some details to the leaves and large flowers with one of the fondant veining tools.  Dee added buttercream centers to the little flowers

The big lollipop on top was purchased at Wal-Mart and the other two lollipops are made from tinted white chocolate.  We didn't have a lollipop candy mold for these so we used a cookie cutter as out mold and then glued the stick to the back with more chocolate when it was hard.  It was as delicious as it looks and the birthday girl loved it!  And so did all of her party guests!

Saturday, April 2, 2011

Huge Blog Candy at Cooking With Cricut!

Melin is celebrating 1600 followers (actually she's over 1700 now!) at Cooking With Cricut!  WOW!

And to commemorate and celebrate that benchmark she is giving away some awesome blog candy . . .


Hop on over and check it out -- she has three generous ways to win.  And while you're there, check out the rest of her site -- this is one amazing and talented woman!

Hugs!

~ Jen