Sunday, February 27, 2011

A Bird-Themed Baby Shower

Our friend, Kelly King, recently threw a bird-themed baby shower for some good friends of hers. I created the invitations, menu tags, candy buffet tags, cupcake wrappers and picks, and a welcome sign for the shower and Dee made the cupcakes. She made two dozen hummingbird cupcakes with a cream cheese frosting and decorated with toasted coconut and chocolate covered espresso beans; and two dozen french vanilla cupcakes with buttercream icing. They were yummy! And if you want an excellent hummingbird cake recipe check out Chef Art Smith's recipe here.

Kelly is a chef and caterer -- and throws one heck of a party! She is all about the details. Check out the photos here.  (Sorry . . . Blogger was giving me a fit about uploading so many pictures -- so please go to my photobucket and check out the rest of the photos!)


All of the papers used in the many projects for this shower were either Bazzill card stocks or papers from  Die Cuts With A View's Mediterranean pack.  Here is the run down of Cricut cartridges I used:

Invitation ~ bird cut from Pink Journey
Cupcake Wrappers ~ Cricut Lite Cupcake Wrappers
Cupcake Bird picks ~ Create-A-Critter
Buffet Tags & Beverage Tags ~ Okieladybug's scalloped rectangle cutting file (George)
Favor Boxes ~ Tags, Bags, Boxes & More
Welcome sign ~ Cindy Loo

A beautiful baby shower for a beautiful baby girl!  I hope you enjoyed all of the wonderful eye candy and perhaps gathered some inspiration for your own "tweet" event!

~ Jen

Friday, February 25, 2011

A Thing of Beauty . . .

Charlotte at A Little Bit of Detail sent me "A Thing of Beauty Award."  In her blog post she wrote that she was selecting me and my little blog because I have such a wide variety of projects. And each and every one of them are first class fabulous.  WOW!  Thank you, Charlotte!  I am honored that you think so highly of your Gator neighbor! 

This award was created by Grace at Gracenotes for Today.  She decided to create an award for the special sites which, in her opinion, have it ALL together. Not only are their projects great, but the blog owner has taken the time to make sure the overall blog design is good. This includes spelling, layout, color scheme, titling and pictures.

There are some Rules of Acceptance for the Award!

  1. You can right click on the award and save it to your desktop so it can be added to your blog.
  2. Choose 5 worthy Recipients and list them. Give a reason why you think their blog or work is special
  3. Then list 5 things about yourself including one thing you enjoy about crafting.
One small request. It is not a rule, but Grace would greatly appreciate a link back to her blog attached to the award badge when you display it on your site. Grace has kept the requirements few and simple so people will not feel it is a chore to accept the award. It is meant to be fun and encouraging! Since there are only 5 recipients each time, select them carefully and thoughtfully.

So here are my five (in no particular order):

  1. Melissa at Disney Dreamer Designs.  I love visiting Melissa's blog ~ not only is her artwork inspiring, but you can tell how much she loves her family and life.
  2. Melin at Cooking With Cricut.  I have the honor of serving on Melin's Design Team, but that's not why I chose her.  Melin is uber talented, generous, and has a heart of gold.  And while I've never met her in person, she's one of those people who you know would be your BFF.
  3. Ronnie at Paper Creations:  The Journey Within.  This is one talented lady!  Her altered art projects are simply amazing and she has become a wonderful mentor and friend.
  4. Heather at House Built of Cards.  This talented gal makes and sells her cards to raise money to build homes for widows and orphans in Burundi through a ministry called Sister Connection. One hundred percent of whatever is donated toward the purchase of one of her cards goes directly to this ministry.  I think it is fantastic that she is able to do something she loves while helping women and children in need!
  5. Susan at Busy With the Cricky.  Another uber talented lady who generously shares her cutting files.  She also has excellent video tutorials.
OK.  That was hard!  There are so many talented people and so many wonderful blogs that I could have listed 50!

Five things about me:
  1. My soul mate, the love of my life, and I will celebrate our 10th anniversary on Sunday.  I thank God every day for bringing Dee into my life. 
  2. I love to create ~ if I'm not crafting then I'm thinking about my next project.
  3. I love to teach others to craft.  Most recently I taught a group of seven 5, 6 and 7 year olds how to make different paper crafts.  We all had a blast! 
  4. I'm one of "those" people who can sit down at a new computer program and have it working in about 10 or 15 minutes without ever picking up a manual or doing a tutorial. 
  5. I love to take pictures -- always have; even back in the day when all I had was one of those Kodak Instamatics -- you know, in the dark ages when we had to take our film to be developed. GASP! 
Thanks again, Charlotte!

~ Jen

Wednesday, February 23, 2011

Cooking With Cricut Challenge: Swirls, Twirls & Flourishes

Our Design Team challenge this week at Cooking With Cricut was to use swirls, twirls or flourishes on our project.  I just recently purchased the fabulous Cindy Loo Cricut cartridge from eBay.  It is my new favorite cartridge -- just warning you . . . 'cause you're gonna be seeing it a lot!  LOL!

There are tons of flourishes, swirls, twirls, flowers and other wonderful images along with a really cute font on this cartridge.  And I love the bird and birdhouse . . . and the deer is adorable . . . and . . . well you get the idea!

The inspiration for my card came from the recent influx of birds at our bird feeder.  We have a wonderful glassed in porch on our house that looks out on a heavily wooded Audubon Preserve.  My Mom gave our six year old daughter a bird feeder for Christmas and Dee hung it up on a black, wrought-iron hanger right outside the porch.  Now I know that some of you are saying, "That's a strange gift for a 6 year old."  True.  But not this 6 year old.  Ever since Demi could walk (at 11 months old), she would always make a bee line for my Mom's bird books.  Mom loves birds and loves to know "who" they are and so she has several field guides to birds of North America that live on her coffee table.  And Demi has always been infatuated by them.  So year before last, for her birthday, Mom gave Demi her very own copy of the North American Field Guide to Birds.  She immediately declared that it was her favorite gift!  So a bird feeder was naturally the next step.

My card base is Bazzill brown and is cut to 5 1/2" x 8 1/2".  I then matted a 5" x 8" piece from the Die Cuts With A View Mediterranean paper pack on top.  It is an embossed paper (I had some scraps left over from a client's baby shower I did recently). 

The flourish is from page 40 in the Cindy Loo cartridge handbook and is cut at 5 1/4" wide from the same Bazzill brown.

The bird is cut at 2" wide and is cut using scraps from my stash.  I used some iridescent Stickles on his wings and a bit of 3-D Crystal Lacquer on his eye to make it shiny.

The bird house is cut at 2 1/2" high and I used scraps from the stash for this one too.  The dark brown is a Bazzill as is the pink -- it's called Pinkini.  I also used some Stickles and 3-D Crystal Lacquer on the bird house.  A leftover piece of pale blue yarn tied into a bow serves as the "hanger."

"Thank You" was cut at 4 3/4" wide from a pale green Bazzill scrap and I inked the edges with a dark brown ink pad.  I then coated it with 3-D Crystal Lacquer. 

It's easier to see it in this close up photo. 

On the inside I stamped a cute bird and branch image. I cut a piece of white card stock to 5" x 8" and then stamped it using the same dark brown stamp pad I used on the front. This stamp came from my local Michael's -- scored it out of one of the $1 bins.


Our bird-loving daughter immediately spotted this on my craft table when she arrived home from school today.  "Mom, this is sooooo CUTE!  It would make a great card for my teacher.  She loves birds, too!"

So I guess I'll be putting it away until Teacher Appreciation week in May -- and now that I know her teacher likes birds I'm sure I'll find some other items to "birdify" for her gift!

Thanks for stopping by and checking out my project this week.  Leave me a note and let me know you were here -- I love reading your comments!  And if you have a blog, please leave me the address . . . I'd love to come and visit!

Make sure you fly on over to Cooking With Cricut and see what my fellow Design Team Chefs have "swirled" and "twirled" together for your view pleasure!

~ Jen

P.S.  Mark your calendars for Cooking With Cricut's  Easter-themed "Bunny Hop" on Saturday, April 9th!  You won't want to miss it! 

Sunday, February 20, 2011

Check out this great giveaway . . . and the Liebster Award

Cindy at the Scrapping Room is giving away some awesome blog candy! 

#1. The Your Story Bundle-- which includes . . .  
  • 12" YourStory book binder/laminator machine
  • 12-9x11.5 Laminating Pouch
  • 12-4.5 x 65 Laminating Pouch
  • 1-Paper Trimmer
  • 1-8.5 x 11 black binder
  • 1-8x8 White binder w/window
  • 1- 4x6 black binder linen
  • 1-8.5x11 Binder Brown
  • 1-12x12 black binder
  • 1- user manual

Gift #2. Is the Christmas Village Cricut Cart; and

Gift #3. A Precision Scissor Pack

Now for the how to's and the when . . .
  1. Must become or be a follower and leave a comment with contact information.
  2. Link the giveaway to your sidebar.
  3. Post about the giveaway on your blog.
That's 3 different comments one for each entry. She will use random number generator to select 3 separate winners, the first drawn will win the Yourstory, the 2nd number will win the cartridge and the 3rd number will win the Scissor Pack. The winners will be chosen on March 6, 2011 and if you leave your e-mail she will contact you and if not she will post and you will have 5 days to contact her or she will choose another winner.

Cindy also bestowed upon me the "Liebster Award."
The Liebster Blog Award is given to bring new blogs into the light. It's a great way to share blogs that might not otherwise be noticed and should be. As a recipient of this award I am to pick 3 - 5 blogs, pass it on and do the following: 

  1. Let them know you chose them.
  2. Copy and paste the award to your blog.
  3. Have faith that your followers will rally and show their crafty love back out to those awarded.
  4. And have fun!!
So without further ado my choices are:
  1. Melissa at Scrappy Cupcakes
  2. Kathy at Kathy & Kids
  3. Rexann at I Be Circled
Go check out these wonderful ladies, they all have fabulous sites and are full of wonderful inspiration!!! Thanks again, Cindy! And make sure you go and sign up for her awesome giveaway!!

~ Jen

Wednesday, February 16, 2011

Cooking With Cricut Challenge: Emboss It! & Hop Winners

Our challenge this week at Cooking With Cricut was to use any type of embossing technique or tools. i.e. folders, plates, wet, dry, faux, etc. Well I have to tell you, this is right up my alley!  Before I became addicted to my Cricut I was a rubber stamper.  I have drawers and drawers of stamps, ink pads, embossing powders and other stamping tools that have been begging to be let out of their cabinet to play. 

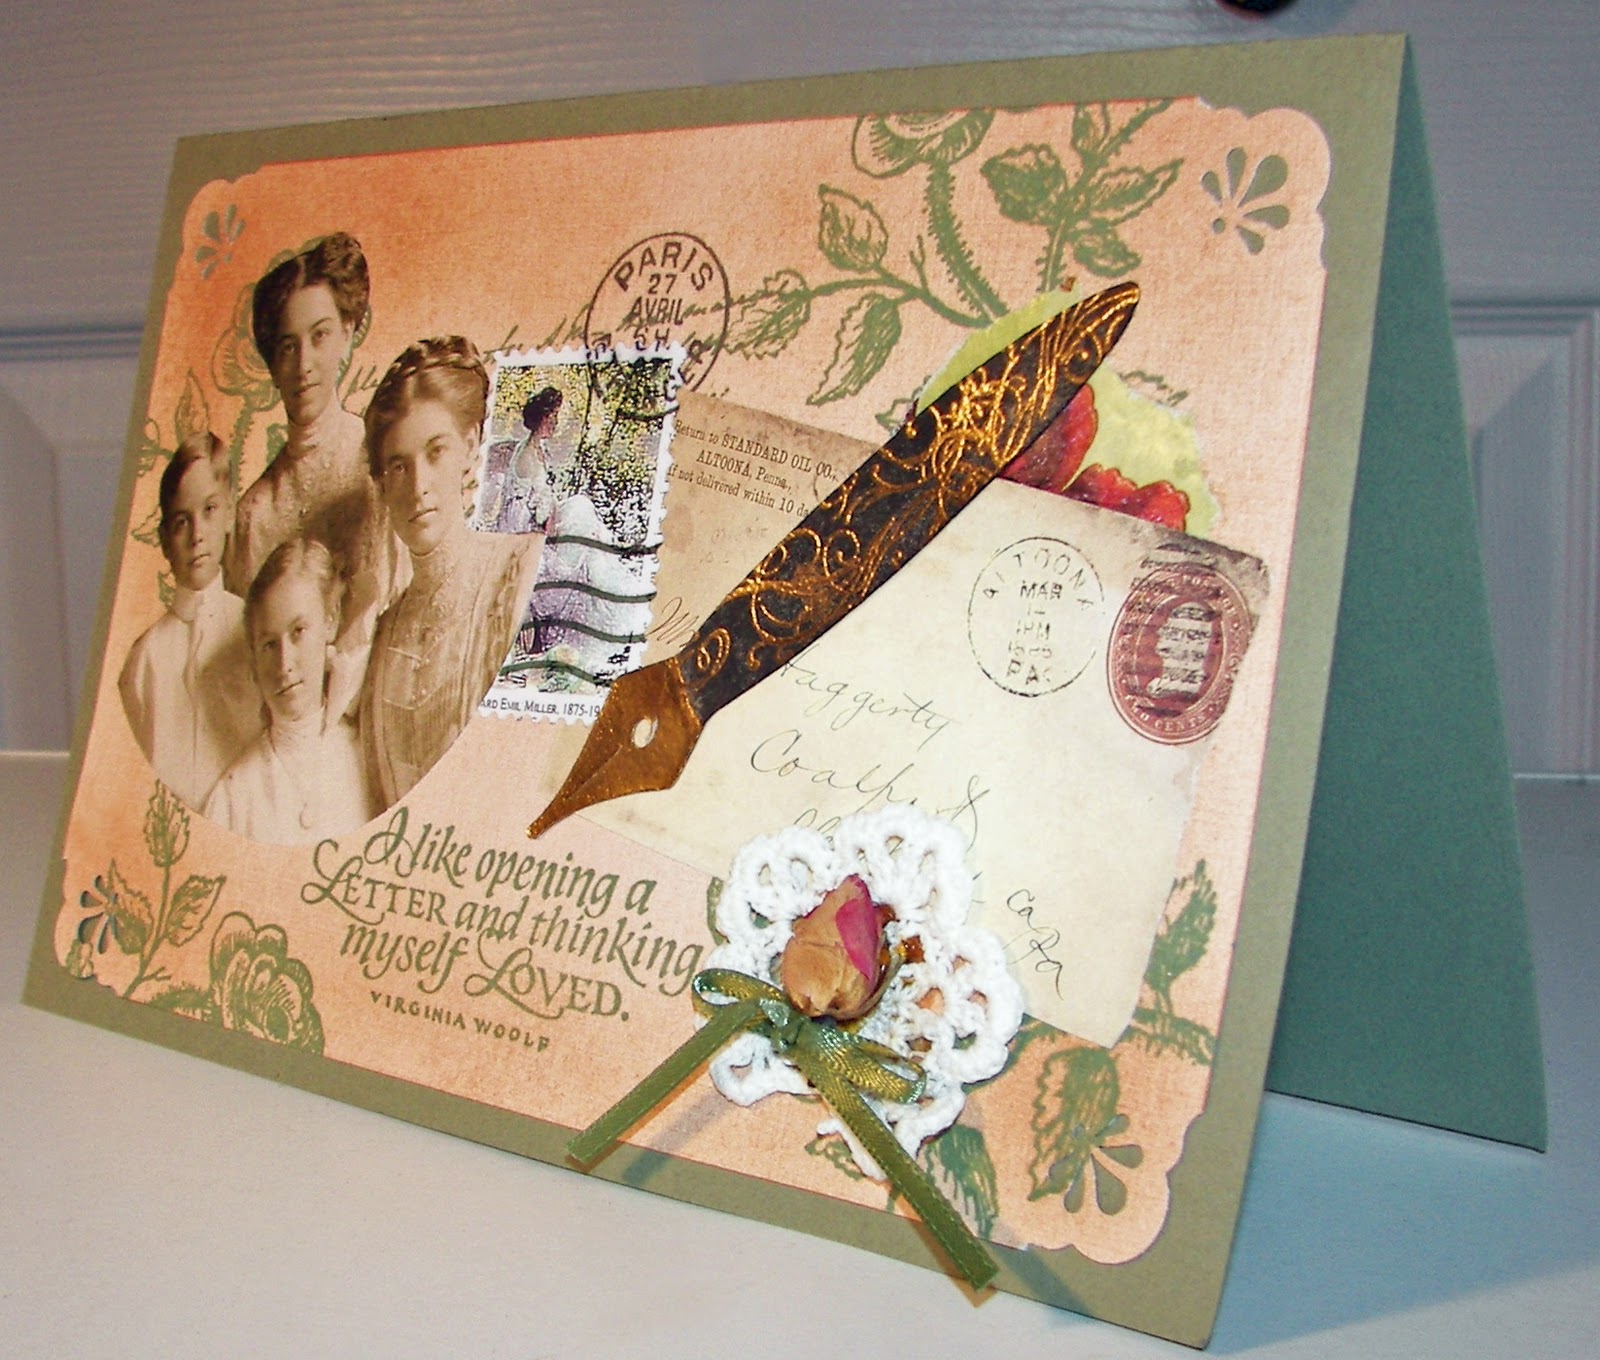
One of my favorite ways to use rubber stamps is in what I call collage cards.  Start with your card base or a mat cut to go on your base.  Use your stamp pad to brush on some subtle color or colors, layer on some rubber stamp images and/or sayings, and then add a layer of ephemera -- photos, old postage stamps, or whatever else your heart desires. 

So you might say I've returned to my "roots" -- this project is not what you've come to expect from me at all.  There is no Create-A-Critter cuts (gasp!), no Pooh, no Mickey, no cutesy stuff anywhere!  I had forgotten how much I loved doing this type of art!  So without further delay . . . my project:

The card base is 8 1/2" wide by 5 1/2" tall and is a sage green.  The mat started its life as an ivory piece of card stock and using the direct to paper technique I brushed it lightly with a russet brown stamp pad.  Using that same stamp pad I then stippled on more color with a stipple brush until I achieved the antique look I was going for. 


I stamped a floral stamp and the Virginia Woolf quote stamp with a sage green stamp pad.  Both of these stamps are from PSX (Personal Stamp Exchange). 

The photo is one of my grandfather and his three sister that I scanned and then printed on my home printer.  This is one of my favorite pictures!  It was taken in 1907 -- he was about 6 years old.  I added a faux postage stamp, a scanned image of an envelope, a rubber stamped faux postage mark, a piece of a crocheted doily, and a dried rosebud tied with  ribbon.   The corners are punched using a Fiskars corner punch I've had for forever.


My Cricut cut for this project is the fountain pen.  It was cut from the Wedding Solutions cartridge -- the original cut has a feather on the end of the pen which I snipped off.  Using a VersaMark ink pad, I coated the end of the pen nib, covered it with detail gold embossing powder and heated.  On the barrel of the pen, I used a stamp made by Inkadinkadoo and randomly stamped the image using the VersaMark Ink pad; then embossed using the same gold powder. 


Once that was cool, I took a black ColorBox ink pad and rubbed it all over the barrel of the pen until I achieved the dark color I wanted.  Then I took a tissue and rubbed the black ink off of the embossed images until my gold embossing was shiny again.  I really have to say, I love the way this card turned out.  The vintage/antique look I was going for turned out exactly how I envisioned it -- I love it when that happens!

Thank you to everyone who played along with the Cooking With Cricut Sweet Shop Blog Hop this past weekend!  I hope you had a great time -- I know the Design Team had a blast.  And for all my new followers . . . I hope you'll stick around and leave a comment with your blog address.  I'd love to come for a visit!

And now . . . . the moment you've all been waiting for . . . . the Blog Hop WINNERS, as selected by random.org, are:

Day 1:  Winner of the Cutting File from Melin at PaperCraftingWorld.com is . . .

# 32 - Linda!  Linda said . . . The kids will love their valentines, I sure do! 


~ and ~

Day 2:  Winner of the five (5) Inkadinkadoo Clear Mini-Stamp sets is . . .

# 7 - Teresa!  Teresa said . . . All of these are adorable. I am a new follower. Thanks for the inspiration.

Congratulations, Ladies!  I will be e-mailing you shortly to get your information.

Don't forget to cruise on over to Cooking With Cricut and check out what my fellow Chefs have created for our embossing challenge!

~ Jen

Monday, February 14, 2011

Happy Valentine's Day!

I hope you all are enjoying a day with your sweetie or at least a day filled with sweet treats!  A few more Valentine projects to share . . . whilst I have been playing in my craft room with the Cricut my better half has been playing in the kitchen.  I make my sweet treats out of paper (no calories), Dee makes sweet treats with eggs, flour, sugar . . . well, you get the idea!

Our first grader decided she wanted to give her classmates Tootsie Roll Pops with their valentine cards this year.  So her crafty Momma got to thinking (gets me in SO much trouble sometimes) why not make the Tootsie Roll Pop an integral part of the design. 

In my wanderings on the web I stumbled across these really cute butterfly valentines at Skip to My Lou -- perfect!  Only I didn't relish hand cutting eleven butterflies, so tada . . . Cricut to the rescue!  There is the cutest butterfly on the Sesame Street Friends cartridge - it even has heart cut-outs on its wings.  I managed to get six on a 12" x 12" piece of Bazzill card stock, added a little bit of glitter, punched two holes, added a valentine's greeting and the Tootsie Roll pop and called it DONE! 

Now, what was I going to do for the six little boys (who I'm sure are not into pink butterflies)?  Well as I was cruising through our Cooking With Cricut Sweet Shop Blog Hop this weekend I saw these cute little lollipop holders that Michelle at Purple Monkey Moments used for her daughter's valentine treats.  SCORE!  These would be perfect for the boys!  I added a little dinosaur from the Create-A-Critter cartridge and the sentiment on the back -- DONE! 

Now for the teachers and office staff . . .  Dee made yummy heart-shaped brownies, decorated them with some royal icing and a few sprinkles then we bagged and tagged them.  The postage stamp shaped card is from the Create-A-Critter cartridge and measures 2 3/4" x 3 3/4".  The patterned paper is one I picked up at Michael's earlier this month -- sorry I don't remember who the manufacturer is.  Then I added a little greeting on the back, punched a hole in the corner and we tied them to the brownie treat bags -- DONE!

Two dozen vanilla confetti cupcakes with pink buttercream icing, sprinkles and candy are also headed to school today.  So it is safe to say that we have done our fair share to sugar up Demi's multi-age class! 

Oh, yeah!  There are also two giant heart-shaped chocolate chip cookies headed to her Girl Scout troop meeting tonight.

Sending you sweet wishes for a very happy Valentine's Day!

~ Jen

P.S.  I'll see you back here on Wednesday for our weekly Cooking With Cricut challenge  . . . if I've managed to survive the sugar-induced coma caused by all of the sweet smells wafting through our house.

Sunday, February 13, 2011

Welcome to Day 2 of the Sweet Shop Blog Hop!

* The Comment Section is now CLOSED.  Check Wednesday to see if you won! *


Welcome to the second and final day of the Cooking With Cricut Sweet Shop Blog Hop.  If you arrived here from from visiting Jenna at My Favorite Things you're in the right place! If you've just happened across my blog and would like to play along with our fun hop, you can go to Cooking With Cricut and start at the beginning. Go HERE.

First things first . . . thank you so much for all the lovely comments you left yesterday!  It was so much fun hearing everyone's response to the four cards I made for the little people in my life. If you're just joining us and missed yesterday's post please scroll down or click here to see what I made yesterday for your Valentine's Day inspiration.  Make sure you become a follower and leave a comment on yesterday's post to be eligible to win this wonderful cutting file or digi stamp from Melin at PaperCraftingWorld.com.  And don't forget to leave a comment on today's post to be eligible to win the five sets of Inkadinkadoo Clear Mini Stamps.  Winners will be chosen randomly on Wednesday, February 16 and will be announced in my weekly Cooking With Cricut Challenge post that morning.


Sunday's Blog Candy


Saturday's Blog Candy


Now on to today's projects.  In addition to two nieces, a nephew and a grandson . . . I also have a 6 year old daughter ("Almost 7, Mom!").  And I certainly couldn't leave her out ~ I'd never hear the end of it!

Ever since I purchased the Love Struck 2010 cartridge I have been wanting to cut out the 3-D mailbox.  After my third, yes third, attempt I wondered . . . what was I thinking!!  As it turns out the third time was the charm. 

This cute little mailbox was cut at 11 1/2" high x 10 3/4" wide on hot pink from a Recollections paper pack.  The ribbon is 5/8" wide and is from a Michael's line called "Made With Love."  The striped heart is from my scrap stash.  The letter stickers are Alphabitties by Provo Craft.  This little mailbox will hold my daughter's favorite treat -- M & M's.

This adorable little snail is from the Create-A-Critter cartridge.  I "welded" two snails together in the Cricut Design Studio to create my shaped card.  She is approximately 3 1/4" high x 4" wide.  The snail's body is from Die Cuts With A View's Cafe Mediterranean paper stack; the hot pink is Recollections; the striped paper is "bless" by Basic Grey.  The white swirl in the center of the shell is a rub-on by Memory Makers.  A little doodling with a white Gelly Roll pen and some bling complete the snail card.

Don't you hate when you create a card only to discover that you don't have an envelope that it will fit in?  Me too.  All my envelopes were just too big.  Then I remember that the Love Struck 2010 cartridge has an envelope with cute little hearts cut out on the flap! 

I used white card stock (Recollections) and cut the envelope at 8 1/2" wide x 7 1/8" high.  I backed the hearts with a scrap of pink, scored the folding lines and assembled.  I then cut a postage stamp at 2 1/2" high from the Create-A-Critter cartridge using a piece of embossed heart paper from my scrap stash.  I added the "Special Delivery" to the front with a hot pink Gelly Roll pen.  Before I give it to her I'll add her name and address -- so it looks like it was really mailed.  (Note:  The envelope could have been a tad bit larger, but it works!)

Here is the “secret” letter you need to collect to be eligible for a prize package at Cooking With Cricut:

I

Now it's your turn! Let’s see your sweet Valentine projects. Be sure to include a Cricut or other die cut machine cut on your project and link it up at Cooking With Cricut. The Design Team will pick their three favorites and one lucky sweetheart will be chosen randomly to win one of the six prize packages being offered in this hop.

Next stop... Jenny at Crazy About Cricut. Go see what she has in store for you today!

And don’t forget, when you're done, make sure to head back to Cooking With Cricut and get entered to win one of SIX prize packages! Here’s how:

  1. Link your sweet Valentine project and be one of the top three chosen by our Chefs.
  2. Link your project and be the randomly drawn winner.
  3. Collect all the letters and unscramble our “secret” phrase correctly and leave it in the special comment section on Cooking With Cricut.
  4. Or just leave a comment at Cooking With Cricut and let us know how you liked our Sweet Shop Blog Hop.
Thanks for "hopping" with us this weekend!  I hope you enjoyed all of the fabulous projects and gathered some inspiration to make your own sweet treats.  Happy Valentine's Day!

~ Jen

Here is our Hop line-up:

13. Jennifer http://www.gator-4-life.blogspot.com/ YOU ARE HERE!


Saturday, February 12, 2011

Welcome to Day 1 of Cooking With Cricut's Sweet Shop Blog Hop

* The Comment Section is now CLOSED.  Check Wednesday to see if you won! *


Welcome to Musings of A Crafty Mom and the Cooking With Cricut Sweet Shop Blog Hop! If you’ve never enjoyed a blog hop before, it’s where you ‘hop’ between blogs following a chain of links, with each blog in the chain posting something exciting for the event! There will even be some great blog candy (giveaways) to win along the way! More on that in a moment!

If you've come from visiting Jenna at My Favorite Things you're in the right place! If you've just happened across my blog and would like to play along with our fun hop, you can go to Cooking With Cricut and start at the beginning. Go HERE.

With Valentine’s Day just a few days away we are sharing some wonderful ideas and inspiration for your viewing and crafting pleasure! Each Design Team member is featuring an original project each day (Saturday & Sunday) made especially for this hop. Make sure to check out each DT member's blog and collect the special letter there. There will be prizes along the way at our DT members' blogs, AND there will be some nice PRIZES with a few different ways to win at Cooking With Cricut!

All of the cards I'm sharing with you today are for the little people in my life.  I have two nieces, a nephew and a grandson all of whom are ages 3 and under.   (Don't forget . . . you can click on the pictures to see them larger.)


We'll start with Layla's card -- Layla is 3 and loves Sleeping Beauty.  So Aunt Jen pulled out the Disney Happily Ever After cartridge and did battle with all those little bitty pieces. 

 The card measures 5 1/2" x 4 1/4".  The card base is Bazzill's Pinkini; the mat is from Die Cuts with a View; the ribbon is by Memory Makers; and all of the other paper is from my scrap stash.  Add a little bling -- after all a Princess has got to have bling -- and viola!  A card fit for a little princess.  Sleeping Beauty is cut at 4 1/2" tall.  The inside of the card reads "Happy Valentine's Day to one of our favorite little princesses!"


Next up, Lexie's card.  Lexie is almost 2 and loves Hello Kitty.  I just purchased this cartridge and it arrived in the mail Thursday -- just in time to create the cutest little kitty for my precious niece! 

The cartridge is Hello Kitty Greetings and it has an awesome card feature.  The card base was cut from Bazzill's Pinkini and measures 5 1/2" tall.  All of the other paper is from my scrap stash. 

Miss Kitty was looking a little plain so I jazzed her up a bit with some glitter.  The inside of the card reads "We think you are the purrfect Valentine!"


And I couldn't leave their new little brother out.  Evan is a day or two shy of a month old and most of his sleepers/outfits have monkeys on them.  Thus, the inspiration for this card!  I used Create-A-Critter for all of the cuts.  The monkey measures about 3 1/2" tall.  The card base is Bazzill's Vibrant Blue and is 5 1/2" x 4 1/4".  All of the paper on this card came from my scrap stash.  The inside of the card reads "We're not just monkeying around when we say we're bananas about you, Evan!  Happy 1st Valentine's Day."


The Pooh Bear card is for my grandson, Dylan.  Dylan is 9 months old now and getting so big! 

The heart card was built in Cricut Design Studio with the George & Basic Shapes cartridge.  I welded two 5 1/4" hearts together and cut them out to create the card base.  Pooh is from the Pooh & Friends cartridge, is cut at about 2 1/2" tall and is attached to the front of the card.  The "luv u" is cut at 1 1/2" tall  and is from the Pooh Font cartridge.  All of the paper used on this card came from my scraps. 

The inside of the card reads "Happy 1st Valentine's Day, Dylan!"


OK, now for your chance at a sweet treat!  I'm giving away two prizes during this hop and all you have to do for a chance to win is become a follower (if you aren't already) and leave me a comment.  That's it!  How easy is that . . . . one lucky winner on Saturday will win the cutting file or digi stamp below courtesy of the mega-talented Melin at PaperCraftingWorld.com and another lucky winner on Sunday will win five (5) clear Inkadinkadoo Mini Stamp sets.  (Disclaimer:  Inkadinkado has no idea who I am ~ nor did they provide this prize.  I purchased these for the giveaway.)


Here is the “secret” letter you need to collect to be eligible for a prize package at Cooking With Cricut:
I

Now it's your turn! Let’s see your sweet Valentine projects. Be sure to include a Cricut or other die cut machine cut on your project and link it up at
Cooking With Cricut. The Design Team will pick their three favorites and one lucky sweetheart will be chosen randomly to win one of the six prize packages being offered in this hop.

Next stop... Jenny at Crazy About Cricut. Go see what she has in store for you today!

And don’t forget, when you're done, make sure to head back to Cooking With Cricut and get entered to win one of SIX prize packages! Here’s how:
  1. Link your sweet Valentine project and be one of the top three chosen by our Chefs.
  2. Link your project and be the randomly drawn winner.
  3. Collect all the letters and unscramble our “secret” phrase correctly and leave it in the special comment section on Cooking With Cricut.
  4. Or just leave a comment at Cooking With Cricut and let us know how you liked our Sweet Shop Blog Hop.
I hope you'll come back to visit again tomorrow -- I'll have all new projects and a chance to win some great stamps.  Thanks for hopping by!

~ Jen

Here is our Hop line-up:

13. Jennifer   http://www.gator-4-life.blogspot.com   YOU ARE HERE!