Thursday, February 28, 2013

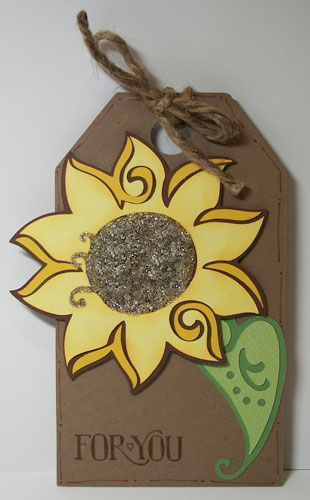
Sunflower Tag

It's Totally Tags 'n ATC Thursdaze at MyPaperCrafting.com!  Every Thursday the Design Team will be exploring different themes, elements, techniques or embellishments in miniature -- tag and ATC sizes only.  There is no restriction on what tools are used to create them -- die cut machines, punches, stamps, etc. The sky is the limit! 

This week our challenge theme is "buttons" and I am back in the garden again -- this time it's sunflowers.  Here is what I made:


And here are the details:
  • My tag measures 4 1/2" tall by 2 1/2" wide and is cut from kraft-colored card stock.  I used a tag from the Cricut George & Basic Shapes cartridge.
  • The flower is from the Cricut Cake Basics cartridge and measures 3 3/4" tall.
  • All of the papers came from my scrap stash.
  • The button is one I "borrowed" from one of my Mom's button boxes.  It originally belonged to my Grandmother and dates back to the mid to late 1930's, if I remember correctly.  It is wooden and the flower patterned is burned into the wood.  I used some brown and white baker's twine for the bow.
  • The white doodle behind the flower is a rub-on by Making Memories.
  • I used ink on the edges of the tag and then a white Gelly Roll pen for my faux stitching and hand lettering.
  • Jute, satin and grosgrain ribbons top my tag.


Thanks so much for stopping by! I hope you'll take a moment and head on over the MyPaperCrafting.com and see what the other Designers created for our button challenge. And make sure you check back in tomorrow for Digi Desserts Fridaze!

~ Jen

P.S.  I'm linking my tag up here . . .

Wednesday, February 27, 2013

Crafts With Cutters Challenge #123

It's another wonderful Wednesday!  Today at MyPaperCrafting.com the Design Team is celebrating that sweet little tooth snatcher -- the Tooth Fairy.  Did you know that there is a National Tooth Fairy Day?  Yep, this year it is being celebrated on February 28.  So here is my contribution to our "Things With Wings" challenge.


I created the 12" x 12" layout to commemorate my youngest daughter's first lost tooth.  Demi was so nervous about losing her first tooth and then the thought of someone sneaking in her room and taking something from under her pillow just about put her over the edge!  LOL!  That first tooth hung on for what seemed like forever!  Oh, the drama and tears!  I finally convinced her to let me touch it; but I had to count to three before I tried to wiggle it.  Well, when we hit two she pulled away and wanted me to stop.  Too late . . . POP, there was her tooth.  She didn't even know it was out!  

Then the drama continued at bedtime -- "No, Momma, I don't want it under my pillow!  I don't want that fairy in my room!"  She finally agreed to write a note to the Tooth Fairy and place it in an envelope, along with her tooth, and we stuck it on the outside of her bedroom door.  That sweet little Tooth Fairy totally understood and left Demi a note along with a very glittery dollar bill in the same envelope, taped to the outside of her door.  There must have been something really special in that glitter, because every tooth she's lost since then has promptly gone under her pillow!  (Or perhaps, it was the note -- the Tooth Fairy told her that the first lost tooth was very special and that she understood Demi was nervous; but the teeth she lost from that point forward would not be swapped for cash unless it was under her pillow.)


Here's the recipe for my layout:
  • 12 x 12 light green card stock by Bazzill.  The hot pink is by Recollections and all other papers are from my scrap stash.
  • The Tooth Fairy poem was found via Google search, author unknown.
  • The Tooth Fairy bear was created using the following PaperCraftingWorld.com cutting files:  Bear in Bikini (legs only) and Bear as QP Angel.  Finished size - 5 3/4" tall.  Ink, pen and chalk were used to embellish this cute little bear.
  • I used the Cuttlebug D'vine Swirls embossing folder on the wings and Stickles for that special fairy sparkle.
  • The tooth is from the Cricut Baby Steps cartridge (handbook, page 61) and is cut at 2" tall.  I used Stickles and a hot pink Gelly Roll pen to do the accents.
  • The text, brackets and photo mats are also from the Baby Steps cartridge.  The text is cut at approximately 1 1/2" tall;  the brackets are 4 1/4" tall; and the photo mats are cut at 7 1/4" x 5 1/5" and 6 1/2" x 4 1/2".  Rhinestones and a hot pink Gelly Roll pen were used for embellishment.
  • The toothbrush is from the Cricut Lite cartridge B is for Boy.  It is cut at 2 3/4" and is embellished with ink, pen, Stickles and some purple rhinestones.


Thanks so much for stopping by!  I hope you will take a moment and head on over to MyPaperCrafting.com and see what other "winged things" the Design Team created.  And make sure you check back on Thursday for our Tags 'n ATC Thursdaze and Friday for Digi Desserts Fridaze.  You'll also want to mark your calendar for Saturday, March 9 -- we're hosting a one-day "24 Carrot EGG-stravaganza Blog Hop."

~ Jen

Monday, February 25, 2013

Getting "Sophisticated"!

Good morning!  I am pleased to be sharing a couple of projects today over at MyPaperCrafting.com for the Monday Cartridge Showcase.  Today we are featuring projects using the Cricut Sophisticated cartridge.  

You will love with the richly detailed images on this cartridge designed by Teresa Collins! The keys, chandeliers, flourishes, and other images are beautifully designed and layered. There are great phrases, borders, and fonts to add elegance to your cards, home decor, and scrapbook layouts. It has six creative features: Phrase, Border, Font 1, Font 2, Font 2 Shadow, and Base/Phrase Shadow.

My Mom recently celebrated a birthday.  Mom is an avid bird watcher -- there are no less than 3 bird feeders in her yard as well as a fountain and birdbath.  She even keeps a small pair of binoculars and a birding book by her kitchen window which looks out on one of the feeders and the birdbath.  So for her birthday I knew I wanted to create something bird-themed.  I found two sweet little ceramic birds at Michaels recently and paired them up with these two little bird houses I scored in one of their dollar bins last Fall.


I decoupaged the bird houses with papers from two different Paula Deen 6 x 6 paper packs that I also discovered in the dollar bins last Fall.  The orange and the light blue matched the ceramic birds perfectly!

The orange birdhouse features Fleur de lis 3 (handbook, page 47) cut at 2 1/2" tall from a scrap of kraft paper.  The bird (handbook, page 51) on the blue house was cut twice at 2 1/2" tall.  I sandwiched a dowel between the birds to make it stand up.

I also made Mom a card using this cartridge.


As much as Mom loves birds, she loves her flowers and garden that much more!  So a floral card was a must.  Here's the recipe for the card:
  • My base card measures 5" wide by 7" tall and is a piece of Bazzill's Pinkini card stock.
  • The decorative mats (handbook, page 64) were cut at 4 1/2" wide, 4" wide and 3 1/2" wide.  The striped card stock is by Basic Grey and is called Sultry-Fashionable (sul-1148).  The white is just plain old white card stock.  The green patterned paper is from DCWV's Cherry Limeade Stack.
  • The flowers (handbook, page 52) were cut from Bazzill Chablis and Pinkini card stocks at 1" high (dark pink) and 1/2" high (light pink) and embellished with small pearls.
  • The flower branch is Flourish1 (handbook, page 55).  I cut it at 4 5/8" from kraft card stock.
  • The phrase is from the Cricut Cake Basics cartridge and measures 4" wide.  It was cut from Bazzill's Chablis card stock and plain white card stock and embellished with some tiny pearls.
Thanks for stopping by and checking out my "Sophisticated" projects.  I hope you enjoy them as much as my Mom did!  Please take a moment and stop by MyPaperCrafting.com and see what Design Team members Charlotte and Melin created using this beautiful cartridge.

~ Jen

Sunday, February 24, 2013

IFTL Card for Claire by Lindsey


Lindsey, age 7
Brownie Girl Scout Troop 1519, Gainesville, FL

PCW File used:  Bird and Birdhouse

IFTL Card for Claire by Lily


Lily, age 7
Brownie Girl Scout Troop 1519, Gainesville, FL

PCW File used:  Lamb I Love EWE set


IFTL Card for Claire by Lila


Lila, age 7
Brownie Girl Scout Troop 1519, Gainesville, FL

PCW File used:  Bear Princess Standing

IFTL Card for Claire by Kiara


Kiara, age 7
Brownie Girl Scout Troop 1519, Gainesville, FL

PCW File used:  Soda-Lightful

IFTL Card for Claire by Katy


Katy, age 7
Brownie Girl Scout Troop 1519, Gainesville, FL

PCW File used:  Heart Bear

IFTL Card for Claire by Hailey


Hailey, age 7
Brownie Girl Scout Troop 1519, Gainesville, FL

PCW File used:  Bunny Showers of Love

IFTL Card for Claire by Demi

Demi, age 8
Brownie Girl Scout Troop 1519, Gainesville, FL


IFTL Card for Claire by Darian


Darian, age 9
Brownie Girl Scout Troop 1519, Gainesville, FL

PCW File used:  Bluebird in Flower

IFTL Card for Claire by Christi


Christi, age 7
Brownie Girl Scout Troop 1519, Gainesville, FL

PCW File used:  Brown Bunny with Hat


IFTL Card for Claire by Autumn

Autumn, age 7
Brownie Girl Scout Troop 1519, Gainesville FL

PCW File used:  You're So Tweet

IFTL Card for Claire by Alyssa

Alyssa, age 7
Brownie Girl Scout Troop 1519, Gainesville, FL

PCW File used:  Flowers & Bees DS

Friday, February 22, 2013

Super Quick, Super Cute Gift Bag & Tag

TGIF!  I wanted to share a super cute gift bag and tag with you today.  Not only is it cute, but it is quick -- I think it took me the sum total of 10 minutes to put together.  Which is fantastic if you need a quick package wrapper!  The digi is today's freebie at Digi Desserts Fridaze over at MyPaperCrafting.com -- make sure you check out the other Designer's projects and download this cute file.

I used the pre-colored version of the digi stamp and simply printed it out, cut and pasted it onto some papers that were already laying on my craft table.  I corner rounded the tag and the sentiment and tied it on with a piece of left over satin ribbon.  I used some 3-D Crystal Lacquer on the glass and the cherry to give it some shine.  And voila!  A cute gift bag for my soon-to-be 4 year old niece's birthday present.  (Aunt Jen will get extra brownie points for the purple bag and the hot pink paper -- Miss Lexie's favorites!)


Thanks so much for stopping by and don't forget to head over to MyPaperCrafting.com and download your free digi stamp!  Have a great weekend!

~ Jen


Thursday, February 21, 2013

Hydrangea Tag

We're kicking off a new theme at MyPaperCrafting.com today . . . Totally Tags 'n ATC Thursdaze! Thursdays will be the day to explore different themes, elements, techniques or embellishments. There is no restriction on what tools are used to create these tags or ATC's. It could be a die cut machine, punches, stamps, etc. The sky is the limit! (However, if the Design Team uses digi stamps or SVG's they will be from Paper Crafting World.)

If you don't know what an ATC card is, here is a definition from Wikepedia: Artist trading cards (or ATCs) are miniature works of art about the same size as modern trading cards/ baseball cards. They are 2 1⁄2 by 3 1⁄2 inches (63 mm × 89 mm), small enough to fit inside standard card-collector pockets, sleeves or sheets. The ATC movement developed out of the mail art movement and has its origins in Switzerland. Cards are produced in various media, including dry media (pencils, pens, markers, etc.), wet media (watercolor, acrylic paints, etc.), paper media (in the form of collage, papercuts, found objects, etc.) or even metals or cloth. The cards are usually traded or exchanged. 

The great thing about making something small, like a tag or ATC, is that gives you the opportunity try new techniques; or to make things that take too long to do on a larger scale for a layout or card.

This week's element to use on our tag/ATC is ribbon . . . here's what I created:


Here's the recipe:
  • I used the Cricut George & Basic Shapes for my tag base (handbook, pg. 102). It measures 4 1/2" high by 2 1/2" wide and is ivory card stock. The edges were "aged" with a brown ink pad and I used a brown Zig Writer to the doodles. 
  • The jar (handbook, pg. 95) was cut twice using the Cricut Doodlecharms cartridge. It measures 2 1/4" high and was cut from white card stock and then vellum. 
  • I sandwiched the stem of the hydrangea between the card stock and vellum so that it would look like my flower was inside the jar. The hydrangea (handbook, pg. 101) was cut at 3 1/2" high using the Cricut Walk In My Garden cartridge. I used papers from my scrap stash -- the green is "Guacamole" by Bazzill; the darker blue is by Recollections; and the lighter blue is "Splash" by Bazzill. 
  • A few sticky-backed pearls adorn my hydrangea. I used a green Zig Writer for the veins on the leaves. 
  • The word "hydrangea" was printed on the ivory prior to it being die cut. 
  • Satin ribbon adorns the neck of my mason jar as well as the top of my tag.
I love the way my little tag turned out! My mom grows hydrangeas in her yard and they have always been a favorite of mine, too.

Now, I hope you'll head on over to MyPaperCrafting.com and see what the other designers have created. Thanks so much for stopping by!

Wednesday, February 20, 2013

Crafts With Cutters Challenge #122

Happy Wednesday!  Today is "Love Your Pet" Day at MyPaperCrafting.com.  The Design Team has created projects that reflect their love of pets.  I love all animals (except snakes!), but cats are my favorites.  We are currently owned by a fluffy grey cat named "Tucker."  Yes, owned.  Dogs have owners, cats have staff!  

We adopted this cute little fur-ball last August from our local Pet Smart.  I made the mistake of going with my Mom on a "quick run-thru" for some dog food for her pups on a Adopt-A-Thon weekend.  This little guy was in the first cage we passed and he reached out and grabbed me as I went by.  It was love at first sight!

He was tiny, fuzzy and had way too many toes.  (I have a special place in my heart for poly dactyl kitties.  The sweetest cat I was ever owned by was a poly and he ruined me for regular-toed cats.  LOL!)  Needless to say, after holding this sweet boy and having him cozy up under my chin, it was all over except for the paper work.

Tucker is almost a year old now; he's no longer tiny; he has long beautiful grey fur and he has more toes than we originally thought.  And he is a Mama's boy through and through.  He still loves to cozy up under my chin and his purr is so loud I often have to turn up the volume on the TV.  Yep.  I love my cat!

Anyway . . . I wanted to add Tucker to the family scrapbook, so here is his kitten layout.


Here's the recipe:
  • The collar at the top of the page is a strip of card stock cut at 1" high x 12" wide.
  • The paw prints are from the Cricut Lite Meow cartridge.  they are cut at 1" high.
  • The journal tag is also from the Meow cartridge.  It is cut at 2 1/4" wide.
  • The metal buckle is by Momenta.
  • I frequently call Tucker my "PurrBaby" -- so that phrase was a must on this layout.  The "purr" is from the Cricut Lite Four Legged Friends cartridge and is cut at 1 1/8" high.  "Baby" is from the Cricut Alphabet cartridge and it is cut at 1 1/2" high.
  • The text at the bottom of the page is also from the Circut Alphabet cartridge.  It is cut at 1 3/4" high.
  • The sleeping kitty is from the Cricut Four Legged Friends cartridge and is cut at 2 3/4" high.
  • The colored card stock is by Recollections and is from the "Cool Water" paper pack.
  • Some chalk and pen doodling complete this layout.


Thanks so much for stopping by!  I hope you'll head on over to MyPaperCrafting.com and check out the rest of the Team's projects.  And then create your own pet-themed project and link it up -- you have two weeks -- you could be our next "Top Crafty Cutter!"

~ Jen

Wednesday, February 13, 2013

Crafts With Cutters Challenge #121

Happy Wednesday!  Today is challenge day at MyPaperCrafting.com and we have made cards for our teammate Madison's "I Feel the Love" Project.  This month cards are being collected to bring a smile to a 21 year old who lost everything in Hurricane Sandy.  For more info on Alana and/or the IFTL Project please visit Madison's website.

So this little card is made completely from scraps -- that's right . . . every last piece of it is from my scrap stash!  And I even had enough left over to make a second card.

Here is the card for Alana:


And here is the second card:


Here's the recipe:

  • Green gingham border -- Cricut Essentials cartridge, cut at 4 1/4" wide.
  • Orange and Hot Pink squares -- Cricut Lacy Labels cartridge, cut at 2 1/2" wide.
  • White circle -- Cricut George & Basic Shapes cartridge, cut at 1 3/4"
  • The "Sending You Sunshine" was created using Microsoft Publisher.
  • The "Happy Birthday"circle is part of the Birthday Turtle digi stamp set from PaperCraftingWorld.com.
  • The cards are 5 1/2" tall by 4 1/4" wide.
  • Some ribbon and a little bit of bling finish off these cheerful cards!
Thanks so much for stopping by.  I hope you'll head on over to MyPaperCrafting.com and check out what the other Design Team members created.  Make sure you help us welcome our newest Team member, Sheena!

~ Jen


Friday, February 8, 2013

Valentine Cards

TGIF!  I'm participating in Digi Desserts Fridaze at MyPaperCrafting.com today -- I wanted to share some valentine cards I'm making for my 8 year-old daughter's classmates.  I used an adorable digi stamps called Girl Bear Blowing Bubbles which is available at PaperCraftingWorld.com.  


I opened the digi image up in my Micrsoft Publisher program, added the text, printed them out (four to a page), cut the cards, punched two holes, and tied on the cute little bubbles I found at Michaels.  Super easy.  Super inexpensive.    And best of all . . . totally loved by my daughter!

I hope you'll check out the other digi projects the ladies came up with at MyPaperCrafting.com -- make sure you download the free digi while you're there!  We'd love it if you'd join us and upload your digi project, too.

Have a wonderful weekend!

~ Jen

P.S.  I'm linking up my bubblicious card at . . .

Wednesday, February 6, 2013

Crafts With Cutters Challenge #120

Roses are red . . . violets are blue . . . its almost Valentine's Day  . . . here's an idea for you!  How 'bout that!  I'm a poet and didn't know it!  LOL!  All kidding aside, today's "Crafts With Cutters" challenge at MyPaperCrafting.com is to create a project with a heart.  

Here is what I made:


And here's the recipe:

  • The hot pink card base measures 6" x 6" and is from a Recollections 12" x 12" card stock pack called "Butterfly Wings."
  • The green mat measures 5 1/2" x 5 1/2" and is by Bazzill.
  • The candy hearts paper measures 5 1/2" wide by 1" tall.  It is from a Valentine's paper pack I picked up at Target in their $1 spot.
  • The purple is from my scrap stash and measures 5 1/2" wide by 1/2" tall.
  • The ribbon is 5/8" wide and is a sheer pink with white polka dots that I purchased at Michaels.
  • The rhinestones are by Recollections and are also from Michaels.
  • The scalloped circle was cut using the Cricut Lacy Labels cartridge.  It measures 4 1/2" and is from the Recollections "Butterfly Wings" paper pack.
  • The pink mat is from the same paper pack and measures 3 1/2".  It was cut using the Cricut George & Basic Shapes cartridge.
  • The sweet little owl is a digi stamp from PaperCraftingWorld.com.  The file is called Owl Always Love U and is available colored and uncolored.
  • The three little hearts were punched out -- they measure 1/2" tall.
  • I used a white Gelly Roll pen to add my dotty-detail to the scalloped circle.
I hope you'll head on over to MyPaperCrafting.com and check out the wonderful projects the rest of the Design Team created.  Don't forget -- you can link up your "Hearts for You" project for a chance at being named this week's "Top Crafty Cutter."  The Top Cutter gets "bragging rights" and a gift certificate from PaperCraftingWorld.com.

Thanks so much for stopping by!  Have a wonderful rest of the week.

~ Jen

P.S.  I'm linking up my owl card at . . .

Monday, February 4, 2013

Think Tink!

Good morning and welcome to my "magical" Monday!  I am the Designer in charge of this week's Cricut Cartridge Showcase at MyPaperCrafting.com and I chose to feature cuts from the Disney Tinkerbell & Friends cartridge.  There are so many wonderful cuts -- Tink and her pals, beautiful botanicals, butterflies, phrases and so much more.

Our sweet little niece, Kylie, just turned two and she LOVES Tinkerbell.  Her mommy asked if I would create some special party decorations that could later be used in her room.  I've had this cartridge for a little while and hadn't had the time or the courage to use it yet.  If you've ever done any cuts from Cricut's Disney cartridges you'll understand the "courage" part!  There are so many layers and so many itty-bitty pieces -- it can make you cross-eyed and very frustrated!  However, if you stick with it and remember that it's only paper, you can create some very magical pieces!

Here is what I made for Miss Kylie:

Tinkerbell
Fawn


Iridessa
Rosetta


Silvermist
All of the fairies measure between 11 1/4" and 11 1/2" tall.  I used iridescent Stickles to give their wings that special fairy shimmer and 3-D Crystal Lacquer for their eyes, lips and Silvermist's shoes.  And with the exception of the black base piece, all of the paper came from my scrap stash!

A birthday banner was also in order for Miss Kylie's party!


Here's the recipe:
  • Pennants - from the Cricut George & Basic Shapes cartridge; cut at 5 3/4" tall.
  • Letters - from the Cricut Storybook cartridge; cut at 3 1/2" tall.
  • Flower6 (on the right -- page 67) - cut at 3 3/8" tall.
  • Flower7 (on the left -- page 71) - cut at 3 1/4" tall.
  • All papers are from my scrap stash except for the white letters.  They are cut from a  holographic paper manufactured by Recollections.
  • Eyelets and white ribbon connect the banner pennants.
The last component for the party Dee and I created together -- the cake!  There was no Cricut involved in this cake -- but it turned out cute and was very yummy.


Now . . . back to the showcase!

I created this cute tag using the Flower9 cut on page 73.  


Here are the details:
  • Flower9 cut at 4" wide.
  • Leaf (page 70) cut at 3 1/4" wide.
  • Tag cut at 3 1/2" wide by 6" high from the Cricut Tags, Bags, Boxes & More cartridge.
  • Gold Distress Stickles were used for the center of the flower.
  • All papers came from my scrap stash.
  • The sunflower is pop-dotted and I used ink on the edges of the light yellow piece.
  • The stamp is by Stampin' Up!  copyright 1996.
  • Brown pen doodling and a piece of jute complete the tag.

And last, but certainly not least, I made this sweet little valentine for my 8 year-old daughter.


Here's the recipe:
  • My card base measure 5" x 7" and is plain white card stock.
  • The patterned paper is from the Target $1 bin -- 10 sheets for $1.00 and it's acid free!
  • Butterfly2 (page 52) cut at 5" wide.
  • The oval is cut at 4" wide and is from the Cricut George & Basic Shapes cartridge.  I printed the sentiment out from my computer.
  • All papers are from my scrap stash.
  • Iridescent Stickles and pen doodling with white and hot pink Gelly Roll pens.

Thanks so much for stopping by and checking out my showcase.  I hope you'll come back Wednesday and see what I've created for our weekly "Crafts With Cutters" Challenge at MyPaperCrafting.com.

~ Jen