Friday, July 29, 2011

"I Feel the Love" Project for Mia

As promised (in this post) here is the card I made for Mia as part of the "I Feel the Love" Project started by Madison at Funky Cards. On Monday I shared the card I made for Mia's parents and here is the link to Marley's card (Mia's sister).

If you're not familiar with Madison's project, here's the scoop -- Madison started "I Feel the Love" in June. It is a monthly challenge that gives her blog followers the chance to create a card to give someone who may be going through a difficult time.

Last month's recipient was a teacher at her High School who is battling cancer for the second time. Madison collected 22 cards for Ms. Pentoney! This month the recipients are 3 year old Marley, 5 year old Mia and their parents, Nikki and Brent. Marley was diagnosed with a brain tumor near her optic nerve, brain stem and pituitary gland in August 2009. She has persevered through surgeries, a stroke that left her right side paralyzed, and numerous rounds of chemo. Madison has already collected 33 cards this month!

The "Make A Wish" Foundation recently granted Marley's wish and the family received a trip to Disney World. So I decided to make a Minnie Mouse card for 5 year-old Mia.


My card base measures 8 1/2" tall x 5 1/2" wide is made from a piece of Bazzil's pinkini. Minnie is cut at 5" wide and is from the Mickey & Friends cartridge. "Hello" is cut at 5" wide and is from the Cindy Loo cartridge. I used a little bit of chalk for Minnie's cheeks, some bling for flower centers and some pen doodling to complete her card. Other than the card base all of the papers came from my scrap stash. Here is what I started with: 


(I'm linking up Mia's card at Whimsical Wednesdays for their "Use Your Scraps" challenge.)

Thanks for stopping by and checking out my "I Feel the Love" project. I hope maybe I've inspired you to hop on over to Madison's blog and become part of the IFTL Team -- anyone can join -- the only requirement is to share what you love doing with someone who needs some "love."
~ Jen

"I Feel the Love" Project for Marley

As promised (in this post) here is the card I made for Marley as part of the "I Feel the Love" Project started by Madison at Funky Cards.  On Monday I shared the card I made for Marley's parents.  (Check back in a few for the card I made for Marley's sister, Mia.)

If you're not familiar with Madison's project, here's the scoop -- Madison started "I Feel the Love" in June.  It is a monthly challenge that gives her blog followers the chance to create a card to give someone who may be going through a difficult time.

Last month's recipient was a teacher at her High School who is battling cancer for the second time. Madison collected 22 cards for Ms. Pentoney! This month the recipients are 3 year old Marley, 5 year old Mia and their parents, Nikki and Brent.  Marley was diagnosed with a brain tumor near her optic nerve, brain stem and pituitary gland in August 2009. She has persevered through surgeries, a stroke that left her right side paralyzed, and numerous rounds of chemo. Madison has already collected 33 cards this month!
 
 
Marley loves dogs and her favorite color is blue.  So that was the obvious direction to take in making this card! 


I used Create-A-Critter and Cricut Design Studio to create this dog house-shaped card.  The dog house measures 5 3/8" x 5 3/8" and is welded on the top left side of the roof.  The dog food bowl measures 2 3/4" wide.  I used a small dog paw rubber stamp and embossed the paws on the bowl with white embossing powder.  The dog is cut at 2 7/8" wide and is sporting a blue collar.  Some white rub-on letters and pen stitching with a white gel pen complete this card.  I hope it makes Marley smile!  (I am linking Marley's card to the Queen of My Craftroom's challenge -- Create-A-Critter cartridge challenge.)

Thanks for stopping by and checking out my "I Feel the Love" project.  I hope maybe I've inspired you to hop on over to Madison's blog and become part of the IFTL Team -- anyone can join -- the only requirement is to share what you love doing with someone who needs some "love."

~ Jen

Wednesday, July 27, 2011

Cooking With Cricut Challenge: Wascally Wabbits

It's another wonderful Wednesday!  Our challenge this week at Cooking With Cricut was to use a bunny on our project in honor of the 71st birthday of Bugs Bunny!

According to Bugs Bunny: 50 Years and Only One Grey Hare, he was born on July 27, 1940 in Brooklyn, New York in a warren under Ebbets Field, home of the Brooklyn Dodgers. In reality, he was created by many animators and staff, including Tex Avery, who directed A Wild Hare, Bugs' debut role, and Robert McKimson, who created the definitive "Bugs Bunny" character design. According to Mel Blanc, the character's original voice actor, Bugs has a Flatbush accent. Bugs has had numerous catchphrases, the most prominent being a casual "Eh... What's up, doc?", usually said while chewing a carrot.

I created a birthday card using the rabbit from Everyday Paper Dolls and birthday party accessories from Doodlecharms.  The completed card measures 5" x 7" and is made with a turquoise card stock.  The patterned paper mat is by American Traditional Designs -- Tres Chic Brights, "My Words" (c. 2005).  All of the other paper are from my scrap stash.


Everyday Paper Dolls ~ bunny cut at 4 3/4" tall.

Doodlecharms ~ cupcake cut at 2 1/4" tall; party hat cut at 1 1/2" tall; and the gift box is cut at 2 3/8" tall.

I used glitter on the cupcake and party hat.  A small white pom-pom for his tale and 3-D crystal lacquer gave his little pink nose a nice shine!  Some pink blink, a little bit of chalk and some pen stitching complete my little gray hair hare.

Thanks for stopping by and helping us celebrate Bugs Bunny's birthday!  I hope you'll link up your bunny project over at Cooking With Cricut -- you could be this week's Top Chef.

~ Jen

Monday, July 25, 2011

"I Feel the Love" Project & CWC Cartridge Showcase

Happy Monday and welcome to Cooking With Cricut's Cartridge Showcase and my "I Feel the Love" project!  Each Monday a member of the CWC Design Team will featuring projects created using one of their favorite cartridges.  I chose Cindy Loo -- not only does it have some of the cutest die cuts, it also features a font, two cupcake wrappers, an envelope with matching card and a gift card holder.

I created this card as part of one of my fellow CWC Design Team member's incredible outreach project.
Madison started "I Feel the Love" Project in June. It is a monthly challenge that gives her blog followers the chance to create a card to give someone who may be going through a difficult time. 

Last month's recipient was a teacher at her High School who is battling cancer for the second time. Madison collected 22 cards for Ms. Pentoney! This month the recipient is a 3 year old girl named Marley, her 5 year old sister Mia and their parents Nikki and Brent. Marley was diagnosed with a brain tumor near her optic nerve, brain stem and pituitary gland in August 2009. She has persevered through surgeries, a stroke that left her right side paralyzed, and numerous rounds of chemo. Madison has already collected 26 cards for Marley and her family this month!

This card is for Marley's parents, Brent and Nikki. My card base is 5" x 7"  and is from the DCWV Mediterranean paper pack.   All of the die cuts are from the Cindy Loo cartridge.  


  • The mat is an reddish-orange piece of Bazzil card stock cut at 6" x 4".
  • I welded the word "Peace" in Design Studio. It is 2 1/2" wide.
  • The flower is 4" tall and was created with papers from my scrap stash.
  • The ribbon is 7/8" wide and is a sheer green-gold.
I also created cards for Marley and Mia and I will post them later in the week if you'd like to check them out.  If you'd like to join Madison's "I Feel the Love" Project, head on over to her blog and click on "I Feel the Love" on the top menu bar.

Here are some other projects I've created using Cindy Loo. Each one has a link underneath if you'd like to see the details and other project information.

Thank You card

Bird Themed Baby Shower - Welcome Sign

Mother's Day card


Birthday Card


Thanks so much for stopping by today! Don't forget to check back at Cooking With Cricut Tuesday morning to see what this week's Guest Designer has whipped up.  And you won't want to miss this week's Cooking With Cricut Challenge on Wednesday -- here's a hint for you . . . "What's up, Doc?"

~ Jen


Wednesday, July 20, 2011

Cooking With Cricut Challenge: Lollipops

In honor of today being "National Lollipop Day", Cooking With Cricut is all about that sweet confection on a stick!  So grab your favorite lollipop ~ whether it be a Tootsie Roll Pop, a Blow-Pop or my personal favorite, a Charms pop (Do they still sell those?) ~ and enjoy!

The inspiration for my card came from an old box I recently ran across. It belonged to my mother and she kept her childhood treasures in it.  It was passed on to me with most of those treasures intact and I've hung onto it.  It has Raggedy Ann and Andy on the top and I just love the old graphics!  My Raggedy Ann and Andy dolls were my constant companions when I was a pre-schooler.  I also loved reading my Mom's childhood books that featured the red-headed  duo when I was a bit older.  This one was my favorite!

The Paper Doll Dress-Up cartridge has a Raggedy Ann and Raggedy Andy.  All of the paper I used in today's project came from my scrap stash -- except for the card base.  It is plain white card stock and measures 5" x 7".
Here are the cartridges I used and the cut sizes:

Paper Doll Dress Up -- Raggedy Ann cut at 4" tall.

Mickey & Friends -- Lollipops cut at 1 7/8" tall.

Create-A-Critter -- Heart cut at 6" wide. 

Some buttons, Stickles and pen stitching finish off this cute little card.  The greeting inside is computer generated and it says:  "Hoping your birthday is as sweet as you are!  Happy Birthday!"

Thanks for checking out my project!  Pop on over to Cooking With Cricut and see what sweet treats the Design Team has cooked up this week.  I hope you'll link up your lollipop project -- you could be the next Top Chef! 

~ Jen

Wednesday, July 13, 2011

Cooking With Cricut Challenge: Pens or a Sun

Happy Wednesday everybody!  Our challenge this week at Cooking With Cricut was to use our Cricut Colors, Amy Chomas pens, or Cri-Kits.  Or if you don't have or use pens with your machine, to use a sun cut somewhere on your project.  I have a set of Cricut Colors -- and I don't like them.  I've used them a couple of time and I just don't like the colors.  So I used a sun on my project. 

My project today is very special and here's why:  My sister, Elizabeth, and her husband, Matt, are expecting their first child in December.  It was an unexpected blessing and we are all beyond thrilled!  When Elizabeth was a baby, her mom, Linda (my step-mom) used to sing the song "You Are My Sunshine" to her all the time.  As my sister grew up it became their special saying to each other.  Sadly, my step-mom passed away in August of 2006 and didn't get to see Elizabeth marry the love of her life or even meet five (soon to be six) of her eleven grandchildren.  So I wanted to give my sister something extra special for her baby's nursery that would also bring her a little bit of her mom. 

I used the following cartridges:

Hello Kitty Greetings ~ Sun cut at 2 3/4" tall and the rainbow is cut at 4 1/4" wide.

Create-A-Critter ~ Hippo is cut at 2 3/4" tall by 3" wide; Alligator is 1 1/4" tall by 3 1/2" wide; and the Giraffe is 5 1/4" tall by 2" wide.

All of the papers I used were from my scrap stash, except for the paper used to cover the mat.  It is a standard mat for an 8 x 10 frame.  I covered it with basicgrey's "eden" from their euphoria line.

Elizabeth and Matt have already decided on a Zoo theme for the nursery -- hence the animals!  Just waiting on a decision on the furniture so I know what color frame to buy!

I hope you'll take the time to visit at Cooking With Cricut and see the amazing projects the Design Team cooked up!  And we'd all be thrilled if you'd join us this week and link up your inked or "sunny" project.

Thanks for stopping by!

~ Jen

"A Kiss for Lily" ~ A Giraffe-themed 1st Birthday Party

I am so excited to announce that I am a Guest Designer for the Decorate to Celebrate Kid-Themed Birthday Party Challenge that runs July 13-26.  Amy and Rhonda created this awesome challenge blog to showcase decorations for every celebration.  These girls know how to party!

Welcome to Lily's 1st Birthday party!  Lily is the daughter of our dear friends and former across-the-street neighbors, Kelly and Brent, and she recently celebrated her first birthday with a giraffe-themed birthday party.  Kelly is a Chef and caterer who is known for her killer parties!

This party's inspiration was taken from a children's book that Kelly and Lily love called "A Kiss for Lily" by Lia Nirgad.  The story features a giraffe name Lily.  So the color scheme for the party was a given -- brown, orange and yellow.

Get ready -- there are lots of pictures!  Don't forget, you can click on the pictures to zoom in! 

Thanks for stopping by and checking out Miss Lily's fabulous 1st birthday party.  And thank you, Amy and Rhonda for featuring me on your blog -- I'm honored!

~ Jen

Digital invitation created in Adobe Photoshop.
Decorated paint cans (partially filled with
sand) with helium balloons were used as
decorations in various places at the party location.


Paint can detail - Cricut cartridges used:
Create-A-Critter and Pooh Font


Guests were invited to write a blessing or birthday
wish for Lily and hang it on the "Blessing Tree." 
The large giraffe on the chalkboard was created
using the Animal Kingdom cartridge.  She measures
approximately 23" tall.
Kelly painted an old wooden highchair a glossy
bright yellow.  I created the min-banner using the
following Cricut cartridges:  Pooh Font, Create-A-
Critter and Calligraphy Collection (pennants).
Kelly's mom, Diane created this beautiful fondant
covered cake.  They used several different ribbons
on the layers and topped it with a silk flower and a
bejeweled monogram letter "L".

This banner measures about 13' long and is being held by two 23" tall giraffes.
Cricut cartridges used:  Animal Kingdom, Pooh Font and Calligraphy Collection.
The buffet tables were covered with orange tablecloths and featured
a huge stuffed giraffe, a tall metal pail filled with greenery and
sunflowers, orange plastic cutlery wrapped in yellow napkins
and a giraffe-patterned paper napkin "ring."  The yellow frame
holds the buffet menu.
The cupcake table!  Kelly got creative and used plant stands
to hold the cupcakes.  Two wooden wine cases were used to
add some elevation.
Dee created the cupcakes and they were yummy!  They also
disappeared in about 2 minutes flat!  The cupcakes with orange
buttercream are chocolate and the yellow buttercream cupcakes
are french vanilla.  I created the cupcake wrappers using the
Cricut Cupcake Wrapper cartridge.  The toppers were created
using Create-A-Critter for the giraffes and Cupcake Wrappers
for the scalloped circle.  I created  inside layer on the circle in
Adobe Photoshop.
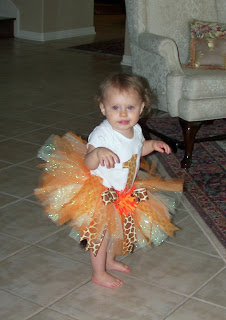
Here is Miss Lily all decked out in the tutu
and onesie I made for her.  Getting her to keep
the hat on proved to be an issue!
The tutu is made with a plain orange tulle and a glittered yellow
tulle.  It is hand tied with five different ribbons in various colors,
widths and patterns were tied in too.  A large giraffe patterned bow
topped with a silk gerber daisy and a giraffe tail complete the tutu.

The tail totally makes this tutu!  I took six long
strips of tulle and braided them; added a loop of
brown marabou and hid the connection under a
piece of giraffe ribbon.  I then attached it to the
back of the tutu with some heavy-duty thread.

I hot glued medium sized pale yellow rhinestones to the center
of the gerber daisy.  After all, a girl's got to have a little sparkle
and bling on her birthday!
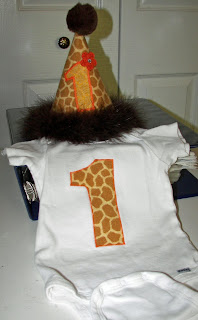
A white onesie with an appliqued number
one and matching birthday hat.  A big
thank you to my Mom for doing the
applique on the onesie!  We struggled
with the onesie and Mom saved the day!
And it wouldn't be a birthday party without a party hat!
This cute little fabric party hat is made with two different
fabrics fused together with ultra Heat 'n bond.  Dee appliqued
the number one before she sewed the hat together.  I hand
stitched the marabou to the edge and then hot glued a brown
pom-pom on top.  The little orange flower is a felt scrapbook
embellishment -- also hot glued.  I then tacked on an elastic
chin strap.

Monday, July 11, 2011

Mickey & Friends Monday at Crazy About Cricut

I am thrilled to be today's Guest Designer at Crazy About Cricut's Mickey & Friends Monday! Jenny, like me, is a lover of all things Disney and all the magic that they bring. So when Cricut started coming out with these carts she was thrilled and so was I! However, neither of us was so thrilled when we realized they were a little more intimidating to put together than cuts from other cartridges. Her hope is to inspire everybody to give these cuts a try. They are more work to put together, but SO worth it! Jenny has invited some guest designers to help her spread the Disney magic. We will all be sharing some tips with you on how to make them a little easier to put together, and also showing some finished projects with great ways to use these cuts. I hope you enjoy these magical projects and will head back every Monday to Crazy About Cricut for your dose of Disney!

We are all about Disney Princesses at our house -- as is anyone I've met who has a daughter under the age of 10! And I think they are tougher to assemble than Mickey, Pooh or any of the rest of the gang. My 7 year old loves Jasmine! So I made this scene from Aladdin to hang in her bedroom.

The base is a 12 x 12" sheet of navy blue card stock (Recollections brand). 
It will fit nicely into a 12 x 12 Plexiglas scrapbook frame and hang over her dresser. The frame I have is open on either side -- this will make it easy to swap out when she decides its time to showcase a different princess.

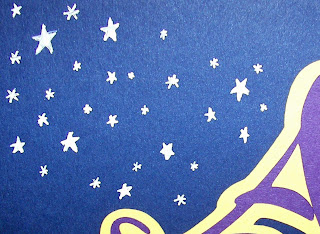
I used the Dreams Come True cartridge for all my cuts. Jasmine & Aladdin were cut at 10" wide by 6 3/4" high. "Aladdin" was cut at 8 7/8" wide by 3" high. All of the paper came from my scrap stash.  I drew the stars free-hand with a white Gelly Roll gel pen. The clouds were created using a mask and a white rubber stamp ink pad. 

I never cut the eyes for any of the princesses! The are too small, get lost and more often than not, never cut properly. My solution - a white Gelly Roll pen and markers. I fill in the eye with white and let it dry completely. Then it gets a second coat if needed. Then I use my Zig Writers for the iris and pupil. Piece of cake!

Another tip for you . . . keep all of your pieces on your Cricut mat until you're ready to glue them down. That way they won't get lost or inadvertently thrown away!

Thanks for stopping by and checking out my Mickey & Friends Monday project. Leave me a comment and your blog address -- I'd love to come and visit!

~ Jen


Wednesday, July 6, 2011

Cooking With Cricut Challenge: Anything Goes!

Happy Wednesday and welcome to our Cooking With Cricut "Anything Goes" Challenge.  With the long 4th of July Holiday weekend, Melin gave the Design Team freedom to choose whatever we wanted to create. 

Now I don't know what the weather is like in your neck of the woods -- but here in central Florida it is HOT!  Hot, humid, hot . . . and did I mention that its hot?  Is there anything better than a glass of lemonade on a hot summer's day? 

My card base measures 9 1/4" tall by 4" wide and is plain white card stock.  The green mat is Bazzill's Spring Breeze and measures 9" tall by 3 3/4" wide.  The gingham mat was cut using "Just Because" Cards cartridge and measures 8 1/2" tall by 3 5/8" wide.  The tag was cut from plain white card stock using Tags, Bags, Boxes & More cartridge and measures 1 1/4 tall by 1 3/4" long.  The glass of lemonade was also cut using "Just Because" Cards cartridge and is 4 1/2" tall.  A bit of red and white stitched grosgrain and some  red bling completes the outside of this card.

The tag reads "When life gives you lemons . . ." and the computer generated greeting on the inside of the card reads ". . . trade them in for limes and make MARGARITAS!"

Mmmm . . . margaritas!  Yum!  So, wherever you are . . .  take a break, have a glass of ice cold lemonade (or a frosty margarita, if you're so inclined) and cruise on over to Cooking With Cricut and see what the rest of the Design Team whipped up for your viewing pleasure.

We'd love it if you'd link up your "Anything Goes" project over at Cooking With Cricut.  The sky's the limit!  Remember, your project must include a die cut! 

~ Jen