Friday, November 30, 2012

Quick Birthday card using Digi Stamps!

It's time to share another wonderful digital stamp designed by my super-talented friend, Melinda Beltran!  All of Melin's digi stamps and cutting files are available for purchase at PaperCraftingWorld.com (December 1st - 25th she will be giving away files each day as part of the 3rd Annual 25 Days of Crafting Showcase at MyPaperCrafting.com).

I used the Birthday Turtle set to create this card for my son's upcoming birthday.  (I can't  believe he is going to be 27!!!)  


This set comes with the line art turtle and a pdf file with three different sizes of the "Happy Birthday" Cupcake circle.  This is one of Melin's older designs and there isn't a pre-colored digi included -- so I used my Photo Shop program to color it and then printed it out.

My card measures 5 1/2" square.  All of the paper is from my paper stash!  The gingham mat was cut using Cricut's Cake Basics cartridge at 5" square.   The blue mat is cut at 3 1/2" wide by 4 1/4" tall and the red mat is cut at 2" -- both cuts are from the Cricut Cindy Loo cartridge.  A piece of jute finishes off this super cute and quick card.

Thanks so much for stopping by.  Head on over and check out the other Designer's digi projects at MyPaperCrafting.com.  And don't forget to join us tomorrow, Saturday, December 1st, for Day One of our 25 Days of Crafting Showcase -- there will be tons of inspiration, freebies and weekly giveaways!  See you there!

~ Jen


Thursday, November 29, 2012

2nd Birthday Party featuring Minnie Mouse!

One of our nieces just turned two.  Makayla lives in North Carolina and we don't get to see her very often; so when her Mommy and Daddy called and asked if we could help out with her Minnie Mouse birthday party, we said "Absolutely!"  When we asked what they wanted the answer was "Minnie Mouse, lots of pink and zebra stripes."

Here is what we created:

Yummy two-tiered cake made by Dee.  

Cupcake pics -- made using the Cricut Mickey Font cartridge.

Cupcake wrappers -- made using the Cricut Cupcake Wrappers cartridge.

All of the wall decorations were made using the Cricut Mickey & Friends cartridge.


Hand-tied tutu with a long-sleeved onesie.  The stencils were cut using the Cricut Mickey Font cartridge .
 Dee's brother and sister-in-law were headed up for Thanksgiving and took everything with them -- I am very pleased to say that the cake traveled well!  And Makayla loved all of her "Minnie Mouse stuff"!


Thanks for stopping by!  I hope you will drop back by tomorrow -- I have a digi stamp card ready to share with you.  Oh!  And you'll definitely want to come back by Saturday for the first day of MyPaperCrafting.com's 3rd Annual 25 Days of Crafting Showcase!

~ Jen

Wednesday, November 28, 2012

CWC Challenge: Anything Holiday with Red and/or Green

Welcome to our last CWC Cricut challenge of 2012 at My Paper Crafting.com!  Saturday, December 1st kicks off our 3rd Annual 25 Days of Crafting Showcase -- with tons of daily inspiration, free cutting and digi files; as well as weekly giveaways!  Our weekly challenges will resume on Wednesday, January 2nd.

This week Melin challenged the Design Team to come up with a holiday project using red and/or green as the predominant colors.  Here is what I created:


I haven't quite decided what the final resting place is going to be for my "NOEL", so I stuck them on this unfinished wreath for display purposes.  

And here is the recipe:
  • Cricut's Joys of the Season cartridge was used for all of the ornaments and embellishments.
  • Cricut's Cake Basics cartridge was used for the letters.
  • All of the letters are raised with pop dots.
  • All papers were from my scrap stash.
  • All of the ornaments measure 4 7/8" tall.
  • I used green, red and white Stickles on three of the ornaments.


Thanks so much for stopping by!  I hope you'll head over to MyPaperCrafting.com and see what the other Design Team members have created.  And don't forget to join us beginning this Saturday, December 1st for 25 Days of Crafting inspiration, freebies and giveaways!

~ Jen

Monday, November 19, 2012

Cartridge Showcase: Joys of the Season

Today over at MyPaperCrafting.com I have teamed up with my fellow CWC Design Team member, Court of Court's Craft Corner, to bring you all things Christmassy with the Cricut Joys of the Season (JOTS) cartridge.  This is the first holiday/seasonal cartridge I purchased and it is the only Christmas cartridge I had until just recently.  So I have used it a lot!

Here is what I created just for today's showcase . . .


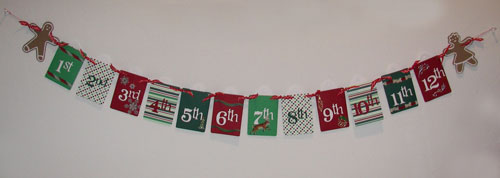
This is an interactive banner/wall hanging for my 8 year old daughter.  Her Winter Break from school starts December 20 and classes resume on January 3.  The holidays are always such a busy time and quite often I'm not as available as she needs me to be.  This little project will ensure that my girl gets special "Momma time" each day.  Each of the pockets has a tag with an activity that she and I will do together.  


There is a tag for each day, except Sundays.  Here is a sampling of what is on the tags:
  • On the 1st day of Winter Break my Momma said to me:  "Let's bake some Christmas cookies."
  • On the 5th Day of Winter Break my Momma said to me . . . “Merry Christmas!  Let’s spend the day with family.”
  • On the 6th Day of Winter Break my Momma said to me . . . “Let’s pop some corn and watch a movie.”
  • On the 10th Day of Winter Break my Momma said to me . . . ”It’s New Year’s Eve—let’s stay up late!”
  • On the 12th Day of Winter Break my Momma said to me . . . ”What do you want to do today?”
The pockets are the gift card holder on the JOTS cartridge and they measure 4" tall by 2 7/8" wide.  The tags are also 4" tall, but measure 2 1/4" wide.  The numbers are the "12 Days of Christmas" numbers and they are 1 1/4" tall.  I used tons of left over stickers to decorate the pockets and tags.  The little gingerbread man and woman are 4" tall and were cut using the Gingerbread cartridge. 

Next up is one of my all-time favorite scrapbook layouts.  Most of the cuts were made using the JOTS cartridge.  For more details on the cartridges used and the cut sizes click here.


Here's a quick little gift card holder.  The "J" Christmas stocking, the "O" snowflake and the tag are all from the JOTS cartridge.  Click here for the original post for more details.


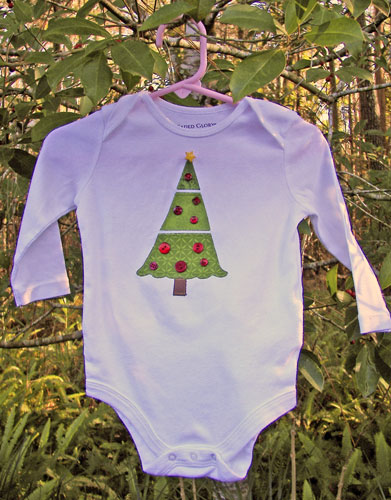
I love to use my Cricut to cut fabric!  I have made so many shirts and onesies for the kiddos in my life . . . here is a onesie I made for one of our nieces last Christmas using the JOTS cartridge.  Click here to see more details.


And last, but not least, is a candle holder featuring poinsettias cut from the JOTS cartridge.  This is one of those projects that I wasn't too sure was going to turn out the way I envisioned it.  I love the way it looks -- very elegant with the gold and ivory!  Click here to see the details on the original post.  


Thanks so much for stopping by!  I hope that I've inspired you to pull out your Joys of the Season cartridge and create!  Want even more ideas?  Then head on over to MyPaperCrafting.com and check out what Court created too!

Make sure you mark your calendars!  December 1st kicks off MyPaperCrafting.com's 3rd Annual 25 Days of Christmas Crafting with 25+ Designers, daily freebies, tons of holiday inspiration and weekly prizes.  You won't want to miss it!

~ Jen

Wednesday, November 14, 2012

CWC Challenge: Christmas Card Outreach

It's another wonderful Wednesday and today I'm sharing a "Hoot" of a card!  Our "Crafts With Cutters" Challenge this week at My Paper Crafting was to create a card for the "I Feel the Love" Project's November/December outreach.  Our teammate Madison is collecting Christmas cards for children that will be spending the holidays in the Children's Hospital of Central California.  I really hope you'll join us and make a card to cheer up a sick kiddo!  (Click on the IFTL Project link for more information.)

Here is what I came up with:


And here's the recipe . . .
  • Cricut Hoot 'n' Holler cartridge.
  • All of the paper is from my scrap stash except for the card base.  It is a light blue card stock by Recollections.
  • My card measures 4 1/4 x 5 1/2 (folded).
  • The branch is cut at 4" wide; Santa Hat is cut at 1 1/4" tall; and the Owl is 2 1/4" tall.
  • The "Ho Ho Ho" stamp is by Studio G.
  • I inked the edges on the branch and ornament bulb with rubber stamp ink.
  • The red glitter and holographic glitter (on the hat and text) are by Studio G/Hampton Arts.
  • I used a hot pink Gelly Roll pen by Sakura for the doodling on the owl.
Thanks so much for stopping by!  Now head on over to My Paper Crafting and check out the cute cards the other Designers created.

~ Jen

Sunday, November 11, 2012

Princess Cake!

Our niece Layla turned 5 years old last week and we celebrated this afternoon at a local park.  Her cake request . . . "A Sleeping Beauty Cake, please!  With lots of pink!"


Dee has been wanting to make a "doll" cake for quite awhile and now she doesn't ever want to make one again!  LOL!  This cake takes forever to bake and she had a lot of trouble with air pockets in the cake.  Now, having said that . . . this was a gorgeous cake!  The cake is chocolate.  She cut it into four layers and used chocolate mousse filling in between the layers.  It is iced and decorated with buttercream only.  The birthday girl loved it!


The Sleeping Beauty doll is sporting a buttercream bustiere with a buttercream necklace.  She also used sugar pearls along the waist, the edge of the dress and on the necklace.  I used my Cricut to create the text on the cake board -- Mickey Font (text) and Happily Ever After (crowns) cartridges.

Cupcakes were also important to the birthday girl -- they are Funfetti cake and frosted with buttercream.  Dee also made little rosettes with sugar pearl embellishments for the tops.  The wrappers were made using the Cricut Princess Party cartridge.


I always makes a special shirt for the birthday girl (or boy).  And Layla's had to be princess-themed, of course!


This was created using the freezer-paper method.  The tiara is cut from the Cricut Princess Party cartridge, the pink text was cut using SCAL and the "Princess" is from the Cricut Life's A Party cartridge.


Isn't she cute!  It is hard to believe that she is already 5 . . . which means very soon her brother will be 2 and her sister will be 4!!  They are growing up way too fast!

Thanks for stopping by!

~ Jen

Friday, November 9, 2012

Minnie Mouse Cake

A quick post to share the latest cake creation!  Dee and I have have made several Minnie Mouse cakes over the last 3 or 4 years, but this is the first time we've done one with the traditional red and black theme.  This is a fairly simple cake (by request) and is a one tier, white cake filled with vanilla buttercream and covered in fondant.  There are fondant accents with a red M & M candy border.


Half a dozen of these cuties accompanied the cake:


Funfetti cupcakes with vanilla buttercream.  I used my Cricut to cut out the text circle on the cake board as well as the wrappers and picks.  I used the Cricut Cupcake Wrappers cartridge for the wrappers; Mickey Font for the text ring and picks.  Mickey Font was also used to cut the template for the large Minnie head and bow on the top of the cake.

Thanks for stopping by!  More cake fun to come this weekend as we create a Princess cake for our niece Layla's 5th birthday!

~ Jen

Wednesday, November 7, 2012

My Paper Crafting Challenge: Anything Goes

It's another wonderful Wednesday!  And if it is Wednesday, you know that its challenge day at My Paper Crafting!  The Design Team was tasked with using something old from their scrap/craft supplies stash and the theme is "Anything Goes."

Here are two birthday cards I created using paper from my stash and some brads and jute that I've had for forever.  The first card was designed by my 8 year old daughter for her Grandpa's birthday.  He loves sweets just as much as she does!

I used the Cricut Birthday Bash cartridge for the sundae and the inside sentiment.  The "happy birthday" is from the Create-A-Critter cartridge.  We used some 3-D Lacquer to add some shine to the cherry, sprinkles and the spoon handle.  Some ink and pen doodling complete this yummy card.


Next up is the card I made for my step-Dad.  I don't know about you, but I struggle sometimes to make masculine cards.  However, this one was quite easy and I like the way it turned out.  I used the Cricut George & Basic Shapes cartridge for the stars and the tag.  


The papers used on both of these cards has been sitting in my scrap stash for quite some time.  The brads and jute on the second card have also been hanging around the craft cabinet for ages.  The "Happy Birthday" stamp is one I purchased in the early to mid 1990's -- I think that qualifies for something old, don't you! 

Thanks for stopping by and taking a look at my "Anything Goes" projects.  I hope you'll join us and link up your project at My Paper Crafting for a chance at being this week's top "Crafty Cutter".  Head on over and check out what the other Design Team members created using their stash!

~ Jen

Monday, November 5, 2012

Cakes!

Just wanted to share two cakes that Dee and I made and delivered on Saturday.  They turned out awesome (if I do say so myself)!  And the birthday boy and his parents loved them . . .

First up:  ANGRY BIRDS!  This is a one tier cake.  One layer of white cake and a second layer of chocolate.  Filled with buttercream and covered in fondant.  All of the decorations on the cake are fondant and the border is piped buttercream.  I used my Cricut to make the paper "Happy Birthday" on the cake board. (I also use SCAL to cut a template for the bird's features.)


And one dozen cupcakes (6 white cake and 6 chocolate cake) with buttercream frosting.  The Yellow Angry bird was created using Angry Bird graham cracker cookies we found at the grocery store (you could also use Nilla Wafers).  The cookies are covered with Wilton's Yellow Chocolate Candy Melts and then decorated with fondant cutouts.  The black is a new product we found at Michael's that is put out by Chef Duff Goldman -- colored chocolate in piping tubes.  Very easy to use!


Next up:  JAKE & THE NEVERLAND PIRATES!  The birthday boy really wanted a pirate ship on his cake . . . so this is what we came up with.  

This is a two tiered cake.  The bottom is white cake, the top is chocolate.  Both are buttercream filled and covered with fondant.  All of the accents (with the exception of the characters in the portholes, the masts and the sails) are fondant.  The decorations on the bottom were created using another new (to us) product -- Wilton Push Molds.  The wood grain was created using a texture mat.

Jake

Izzy


Scully
Another dozen cupcakes (6 white cake and 6 chocolate cake frosted with buttercream).  I used the Cricut Life's A Party cartridge to create the cupcake picks and wrappers.  I cut the wrappers out of a parchment-type card stock, inked the edges with a brown ink pad, and backed the cutouts with red for the "X" and black for the path marks.  The Jolly Roger picks are just black and white card stock and are folded over a pick and hot glued.


The "Happy Birthday" text on the cake board was also cut using my Cricut and the Mickey Font (text) and Accent Essentials (stars) cartridges.


Thanks for dropping by and checking out our edible art!

~ Jen