Wednesday, October 26, 2011

Cooking With Cricut Challenge: Scarecrow/Hay/Crow & Sketches

Happy Wednesday!  First things first . . . thank you all for joining our "Adopt A Shelter Pet" Blog Hop last Saturday at Cooking With Cricut!  It was so much fun to see all of the CWC Design Team's projects and read the wonderful comments you all left me.  As promised here are the two blog candy winners from the hop.  The first person chosen by random.org was . . .

#8 Patti Ross said . . . "This is adorable!"  (pattilyncreations.blogspot.com)

and the second person chosen was . . .

# 23 Anna said . . . "Just too cute!!!  So adorable!!!"  (mamawann.blogspot.com)

Congratulations, ladies!  I will be sending you an e-mail shortly requesting your snail mail addresses so that I may get your Fall stamp sets in the mail ASAP.

And now for this week's challenge!  Melin challenged the Cooking With Cricut Design Team to use a scarecrow, hay and/or crow, as well as one of three sketches for this week's challenge.  After much searching I discovered that I do not own a cartridge that has a scarecrow, a bale of hay or a crow that looks like a crow.  There is a pile of hay on Everyday Paper Dolls and there is a crow that looks more like a vulture on Paper Doll Dress Up -- neither one fit what I wanted to do.  Hmmmm . . . . what to do?

Then it hit me -- I remembered that I had an old K & Co. Fall paper pack.  Maybe, just maybe there would be something in there that would work.  B-I-N-G-O!

Here's the double layout sketch Melin gave us to work from:


And here is what I came up with:


Here's the recipe:

Plantin SchoolBook --
  • Text cut at 1" h (Our Little Punkin') and 3/4" h (2004).
  • Large photo mat cut at 6 3/4" h by 4  3/4" w.
  • Small photo mats cut at 4" by 4".
Doodlecharms --
  • Pumpkins cut using the border feature at 6" w.
Cake Basics --
  • Flourishes cut at 3 1/2" w.
The two 12" x 12" patterned paper sheets are from K & Co. Fall Paper Pack.  All of the other card stock is from my scrap stash.  I inked the edges of my pumpkins and my journaling mat using a honey brown ink pad by Studio G.  A little pen doodling with a white gelly roll gives it the finishing touches.


My journaling block reads:

 
October 2004 ~ Six months old.

On a crisp October day we drove up to Alachua to the Pumpkin Patch run by the Youth Group of First UMC.  They had some huge pumpkins and several hay bales set up for photos — and you know me, I can’t pass up a good photo op!    You weren’t too sure about sitting on the hay though!  You finally decided it was okay to touch it and before we knew it you had a handful and it was headed to your mouth!


That cutie-patootie is now a big girl of 7 1/2 years.  Demi saw these pictures and said "Mom, I hope you didn't brush my hair like THAT!!!"  I had to laugh!  We used to get asked all the time who styled her hair -- which of course cracked us up -- and we always responded, "No one.  That's just the way it grows!"

In a rare moment today, Demi asked me to take some pictures of her -- we're at that stage where she runs when she sees me with the camera.  So here is a current picture of my beautiful girl!  I look at those photos of her at 6 months old and at her now at 7 1/2 and I wonder where time has gone! 


Now it's your turn! Link up your project at CookingWithCricut.com. Here are a few guidelines:
  • Must follow the challenge topic.
  • Must be a NEW project for this challenge.  No back dated posts, please.
  • Must have a link back to this post on your blog.
  • Must link your project post through Inlinkz and not just your blog.
  • Must use your Cricut in some capacity.
  • Must HAVE FUN! 
  • You may gladly combine challenges . . . we love to pile it on TOO!
Thanks so much for stopping by and checking out my challenge project.  Now . . . head on over to Cooking With Cricut and see what the rest of this amazing Design Team has whipped up!

~ Jen

Saturday, October 22, 2011

Cooking With Cricut's "Adopt A Shelter Pet" Blog Hop

Welcome to Musings of a Crafty Mom and the CookingWithCricut.com “Adopt A Shelter Pet” Hop!  October is National Adopt a Shelter Dog Month, but we wanted to honor and celebrate all of our furry friends and to helping bring awareness to the plight of millions of abused and abandoned animals in community shelters nationwide.  If you've come from visiting Dalis at Stamper Girl, you're in the right place! If you've just happened across my blog and would like to hop along with us, you can go to CookingWithCricut.com and start at the beginning. 
I have a dear friend who is a kindergarten teacher.  She loves animals just as much as she does music, her students and SEC football (although I think she roots for the wrong team)!  Her classroom is decorated with all kinds of furry friends and I wanted to make her something special.   I finally decided upon a door hanging that would welcome visitors and students to her room.

Using my favorite Cricut cartridge -- Create-A-Critter!! -- and the Accent Essentials cartridge here is what I came up with.

This door hanging measures approximately 42"long.  I used a 2" metal ring for the hanger.  My ribbon is a brown grosgrain with turquoise stitching and is 1 1/2" wide.  All of the solid colored mats are Recollections brand card stock.  The patterned papers are from The Paper Studio Basics Paper Pad, except for the top piece and it is from my paper stash.  All other papers are from my stash as well.

Here is the recipe:

Create-A-Critter
Terrier -- cut at 5" tall.  (pg. 35)
Cat -- cut at 5" tall.  (pg. 29)
Dalmation -- cut at 4 1/4" tall.  (pg. 36)
Cat2 -- cut at 4 3/4" tall.  (pg. 38)

Accent Essentials
Accent47 -- cut at 6" x 6" for the base and at 5 1/2" x 5 1/2" for the mat.  (pg. 78)  I hid the inside cut on this frame using the Cricut Design Studio.

I created the center panel using Microsoft Publisher and MS Office clip art for the puppy paws.  It is printed on white card stock and cut to 4 3/4" x 4 3/4".

A little bit of doodling and stitching with a white gelly pen and my Zig Writers gave this cute project its finishing touches!


Now it's your turn!  Link up your purr-fectly wonderful pet-themed project at CookingWithCricut.com.  Here are a few guidelines:

·         Must follow the challenge topic.
·         Must be a NEW project for this challenge.  No back dated posts please.
·         Must have a link back to this post on your blog.
·         Must link your project post through Inlinkz and not just your blog.
·         Must use your Cricut in some capacity.
·         Must HAVE FUN!
·         You may gladly combine challenges . . . we love to pile it on TOO!
And there are prizes!! The Design Team will pick their three favorite entries -- each will receive a $5.00 gift voucher-download from PaperCraftingWorld.com.   One lucky entry will be chosen randomly to receive a $20 gift voucher-download from PaperCraftingWorld.com. There is also a prize for just leaving us some love (a comment) on the CWC blog. One catch, those leaving comments MUST be a CWC follower -- the winning commenter will also receive a $20 gift voucher-download from PaperCraftingWorld.com.

You have until midnight on Wednesday, October 26 to link up your pet-themed project at Cooking With Cricut.  Winners will be announced during our normal post on Friday, October 28. 

I have blog candy to give away, too!  Up for grabs are two clear stamps sets -- each set has five stamps and both sets are Fall-themed.  All you have to do to be eligible to win is be a follower of my blog and leave a comment on this post.  Two lucky winners will be drawn on Wednesday, October 26 and announced during my Cooking With Cricut Challenge post.

Good luck and have fun!  And thanks so much for hopping with us today!
~ Jen

“Adopt A Pet” Blog Hop Participants:

Wednesday, October 19, 2011

Cooking With Cricut Challenge: Purple, Green & Sketches

It's another wonderful Wednesday!!  Our Cooking With Cricut challenge this week was to use the colors purple and/or green and to use one of Melin's amazing sketches (if you felt so inclined).  She also asked us to do something pretty for Mother-in-Law's Day, which is this Sunday; or if we decided to do something for Halloween, to make it cute and not spooky or scary. 

I chose to do a Halloween layout using the double 12" x 12" sketch and used both purple and green.  I have been working on my youngest daughter's albums sporadically, very sporadically!  So this cute LO will be a nice addition.


Here is the recipe:

Paper Doll Dress Up --
  • Pumpkins - both were cut at 2 1/2" tall.
  • Scaredy Cat - cut at 3" tall.

"Just Because" Cards --
  • Decorative Envelope -- cut at 9 7/8" tall (I just used the flap for my "Halloween 2006" title.)

Create-A-Critter --
  • Postage Stamp -- cut at 10 1/2" square. (I used Design Studio to hide the inner cuts.)

George & Basic Shapes --
  • Photo and Journaling Mats - cut at 5" x 7" and 4 1/2" x 6 1/2" respectively.

The patterned card stock (accents and mats) is from DCWV Nana's Nursery:  Baby Boy paper pack. 

The base paper is 12" x 12" black card stock by Recollections

The orange polka dot is by The Paper Studio and all of the other paper is from my scrap stash.

I used various pens for the doodling and yellow stickles for the cat's eyes and the pumpkins' faces. 

The chipboard "BOO" is also by Recollections.


My journaling block reads:
This is the first Halloween that you really understood what Halloween was all about . . . CANDY!  You were 2½ and totally enthralled with “The Wizard of Oz.”  When you told us you wanted to dress up as a witch, we asked you what kind of witch you wanted to be.  You replied, quite matter-of-factly, “A good witch, ‘cause I don’t want to scare any pretties or their little dogs, too!”

You learned this song at Pre-School and sang it ALL the time! 

Five little pumpkins sitting on a gate.
The first one said, "Oh, my, it's getting late!"
The second one said, "There are witches in the air!"
The third one said, "Good folk, beware!"
The fourth one said, "We'll run and run and run!"
The fifth one said, "Let's have some fun!"
OOOOOOOH, went the wind and OUT went the light.
And the five little pumpkins rolled out of sight.

Pictures:  top left ~ Demi & Miss Samantha during the Halloween Parade at school; bottom left ~ Trying to look like a good witch; top right ~ Inspecting our scared pumpkin; bottom right ~ Trick-or-Treating at Dr. & Mrs. Ford’s home.

She was such a CUTE little witch!  And her sweet little voice saying "Trick or Treat!" earned her way more than her fair share of candy -- we only took her to about five houses, all family and friends, but her candy bucket was brimming when we got home!

Thanks for stopping by!  Make sure you head on over to Cooking With Cricut and check out the AMAZING projects the Design Team created!  Then whip out your purple and green and get busy creating and link up to our challenge this week.  You could be our next "Top Chef!"

~ Jen

P.S.  Our "Adopt a Pet" Blog Hop is this Saturday, October 22nd.  Start at Cooking With Cricut and hop along as we celebrate our favorite furry and feathered friend.

Monday, October 17, 2011

Zoo-Themed Baby Shower

Welcome to Cooking With Cricut Cartridge Showcase.  Every Monday and Thursday members of the Design Team will feature one of their favorite cartridges along with some projects that showcase it.  We hope that it will provide you some inspiration -- and maybe you'll use a cartridge that's been collection dust or you'll discover a cartridge that you need to add to your collection.  Today I will be featuring one of my all-time favorites . . . Create-A-Critter!

We recently threw my sister, Elizabeth, a zoo-themed Baby Shower.  She and her husband, Matt, will be welcoming a baby boy in late November/early December.  Baby Everett will be the fourth baby welcomed into our family this year!  A niece and nephew were born on January 14 (no they're not twins) and then another nephew on February 14.

I've already shared with you the door sign and the cake and cupcakes.  Today I will share the rest, as promised! 

The inspiration for the shower was the bedding Elizabeth picked out.   The fabric has teals, lite blues, navy, blues,  brown, khaki, green and white -- our color palette for the shower ended up being lite blue, teal, brown, lime green and white.

Not only did Dee and I create all of the paper decorations, cake and cupcakes, we also created the invitations, favors, diaper cake, table decor and all of the food!  Two of Elizabeth's good friends co-hosted the party with us -- Heather provided the location (her church's fellowship hall) and money for the food; Jessica did all of the shower games, prizes and paper goods (cups, plates, etc.).

All of the papers used were either Bazzill card stock, from a Recollections paper pack or  The Paper Studio Basics paper pack.  All of the ribbon used was purchased at Michaels.

The "It's A Boy" Banner was created in Cricut Design Studio using the Plantin SchoolBook cartridge.  I took a square and welded two triangles flipped on their side for the points.  The pennants measure 8" tall by 5 3/4" wide.  The text was also cut from PSB at 5" tall. 


Create-A-Critter:
  • Monkey ~ cut at 3 1/2" tall.
  • Vine ~ cut at 5 1/2" wide.
  • Zebra ~ cut at 5" wide.
Everyday Paper Dolls:  I ended up using this cartridge because the lion and elephant from CAC were just too wide.
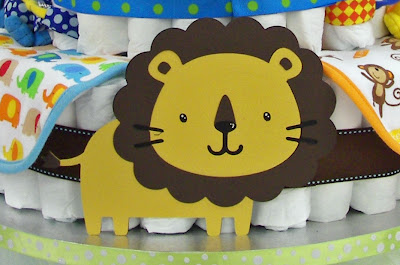
  • Lion ~ cut at 5" tall.  I cut him twice.  Once in dark brown for the mane and then in an orangey-brown for the body.
  • Elephant ~ cut at 5" wide and 4 3/4" wide.
Some pen detailing, inked edges, eyelets and assorted ribbons complete this super cute banner.

This Diaper Cake has 112 size one Pamper Swaddlers, 10 cloth bibs, 3 rattles, 2 pacifiers with paci clips and an elephant toy for the topper. 

After rolling the diapers and assembling the layers, we hid our structural ties behind some beautiful 1 1/2" ribbon.  The diaper cake is "served up" on 16" Wilton Cake Base.  We covered the edge with a 5/8" lime green and white polka dotted ribbon. 

Create-A-Critter:

  • Alligator ~ cut at 8" wide
  • Hippo ~ cut at 6" wide
  • Lion ~ cut at 7 1/2" wide.
Cake Basics:

  • Monogrammed medallion cut at 3 1/2" wide.  I welded the text using Design Studio.  


Here are a few pictures of the other shower decorations and food table.

The tables were covered with plain white table cloths.  We took lime green
and teal blue tulle and ran them down the center.  Covered paint cans with
balloons, candles, favor boxes and wrapped silverware added more pops of color.

Little brown favor boxes held Hershey's Kisses and were tied with a turquoise
satin ribbon.  A tag cut from Plantin SchoolBook was stamped with
"Thank You Very Much" in a bright blue.  We dressed up clear votive holders
with ribbon and the same punched circles that were used on the cupcake picks.
Yummy!  Our luncheon featured sliced ham, turkey and salami; mini croissants and rolls;
condiments for the mini sandwiches included all of the standards plus a delicious Cranberry
Mustard; Curried Chicken Salad; Egg Salad; Santa Fe Pinwheels; Veggies with Ranch Dip; Apples
with Caramel Dip; assorted sliced and cubed cheeses; Zesty Cheese Ball; Baked Brie in Pastry;
White Bean Hummus with Pita Chips; hot Spinach Artichoke Dip with tortilla chips;
Seven Layer Tex-Mex Dip with tortilla chips; and a fresh Fruit Tray with a Creamy Lemon Dip.

The guest of honor, my sweet sister, opening
some gifts.  We had about 30 people at the shower.
Dee and I also made some of her gifts ~ some framed art for the baby's room, half a dozen burp cloths ~ and we bought baby Everett the cutest Christmas outfit! 

The framed art was created using Animal Kingdom and Cake Basics (font) cartridges.  The frames are 8" x 10" white wooden frames purchased at Michaels.  (She really wanted me to do some vinyl cuts for the nursery -- but her walls were just too textured.)


I showed you this piece earlier this summer in this post.  However, when it came time to frame it, the darned thing wouldn't fit -- so I had to re-work it a bit!


It is the chorus from the song "You Are My Sunshine."  Elizabeth's mom (my step-mom) passed away in 2006.  She used to sing this song to her when she was a baby.  As Elizabeth got older it became their special song.  I know how much she is missing her Mom, especially now, and wanted her to have a special "piece" of her Mom in the nursery.  She loved it and even cried a bit -- and then scolded me for making her mascara run!

These burp cloths turned out so cute.  We used some of the nursery fabric we purchased as well as some orange and blue Gator fabric. 

The cloth diapers were purchased at Wal-Mart and then the fabric panel was sewn to the center section. 

It was a great Shower -- everyone had so much fun and enjoyed all of the yummy food and cake.  Now all there is to do is wait for baby Everett to make his appearance!  The nursery is finally finished and loaded to the gills with all the necessary (and unnecessary) baby gear. 

Thanks so much for taking the time to stop by and check out our creations.  Please leave me a comment and your blog address . . . I'd love to come visit and see what you're creating!

Hugs!

~ Jen

P.S.  Make sure you check back on Wednesday for our weekly challenge at Cooking With Cricut and you won't want to miss Thursday's Cartridge Showcase.  One of our new Design Team members, Debbie, will be featuring the Cricut Lite Handy Man cartridge.

Wednesday, October 12, 2011

Cooking With Cricut Challenge: Cake, Cupcake and/or Teddy Bear

Happy Wednesday!  And you know what happens on Wednesdays -- challenge day at Cooking With Cricut!!  So, in honor of  "Bring a Teddy Bear to Work" Day (today), National Cake Decorating Day on October 17th and Chocolate Cupcake Day on October 18th, Melin asked us to work a cake, cupcake and/or a teddy bear into our projects this week.

Well, you won't find any teddy bears in my projects, but I definitely covered the other two requirements and they are YUMMY!  This past weekend was my sister's baby shower and Dee made the most delicious cake and cupcakes.  It was my task to help decorate them.  We just recently purchased a Cricut Cake and it arrived on the Monday before the shower -- with no time to play and learn the ins and outs of the new machine, this cake was decorated "old-school." 


I cut the animal faces out using the Animal Kingdom cartridge and some plain white card stock.  I then used it as stencil on the fondant and cut them out with an exacto knife.  A little bit of water brushed on the backs of the layers of fondant stuck them together nicely. I used a food safe brush and some Wilton food coloring to "paint" the faces on the animals. (You can click on the images to enlarge them.)


The blocks on top are 2" wooden cubes we purchased at Michaels.  We painted them a glossy white and then I mod-podged the papers, letters and animals on.  An additional coat of mod-podge over the finished project sealed them and made it safe to stack them on top of the cake.  I used the Cake Basics cartridge that came with our Cricut Cake machine to cut the squares and letters.  The animals were cut from the Create-A-Critter cartridge.

The bottom tier of the cake is chocolate with a chocolate mousse filling and covered in buttercream then fondant.  The top tier is white cake with a vanilla mousse.  The decorative stripes were cut by hand using a Wilton cutter.  The polka dots were also cut by hand using a small round cutter.  The border around both layers is M & M candies.

The "Welcome Everett" was created in Design Studio using the New Arrival and Cake Basics cartridges.  I welded together the letters and the baby image using a 12" circle as my guide and cut it out of card stock. 

The wrappers and picks for the cupcakes were created using the Cupcake Wrappers cartridge.  I created the center circles using my computer, Microsoft Publisher and a circle punch.


The patterned papers on the blocks and the cupcake wrappers are from a basics paper pack by The Paper Studio.  All of the solid papers are either by Recollections or Bazzill.

Thanks for stopping by!  Check back on Monday to see more of the things I created for my sister's shower.  Now, head on over to Cooking With Cricut and meet our new Design Team members and join in the fun!  Make sure you link up your cake/cupcake/teddy bear project -- you could be our next "Top Chef!"

~ Jen

Wednesday, October 5, 2011

Cooking With Cricut Challenge: Anything Goes!

It's challenge day at Cooking With Cricut!  Melin decided we should have an "Anything Goes" week -- designer's choice of their favorite old project or a new one.  I am in the middle of creating all the decorations and such for my little sister's baby shower this weekend, so I thought I would share with you one of my new faves.  Elizabeth and her husband Matt are eagerly anticipating the birth of their first child -- a boy -- in early December.  And they decided to decorate his nursery in a zoo theme and have selected a bedding called "Modern Zoo." 

I created a door sign -- it will be used at the shower location and then later can hang on my nephew's bedroom door.  I love making these!  It measures 12" x 12" and will fit perfectly into an album frame or a clear scrapbook layout frame.


The turquoise base is 12" x 12" card stock from Recollections.  The next layer is a lime green gingham by The Paper Studio that measures 11 1/2" x 11 1/2".  The white layer is 11" x 11" and is also from Recollections.  All of the other papers are either Recollections or Bazzill.  Here's the recipe:

Cindy Loo -- "Welcome" cut a 10" w.

Mickey Font -- "to Everett's" cut at 1" h.

Create-A-Critter --
  • Redbird, cut at 1 1/4" h.
  • Penguin, cut at 3 1/2" h.
  • Monkey,cut at 2 1/4" h.
  • Giraffe, cut at 7 1/2" h.
  • Zebra, cut at 3 3/4" h.
  • Alligator, cut at 1 3/4" h.
Everyday Paper Dolls --
  • Elephant, cut at 6"h.
  • Lion, cut at 3 1/2" h.
  • Zoo sign, cut at 7 1/4" h.
  • Zookeeper, cut at 4"h.


You will notice there is NO bling on this project -- no cute ribbon or flowers.  It was hard not to "girly" it up!  I did chalk some edges and added a few pen details.

I must confess . . . this has got to be one of my all-time favorite things I have ever created! 

You know how sometimes you envision something and it doesn't turn out like you expected?  Well this one turned out WAY BETTER than I ever imagined it would!! 

My sister is going to love it!


Now it's your turn!  Link up your favorite creation or create something new -- anything goes! -- at Cooking With Cricut.  You could be this week's Top Chef!  And don't forget, today is the deadline to apply for our Design Team -- click here for details if you're interested.

~ Jen

P.S.  Check back next week -- I'll be sharing more creations from the shower!