Wednesday, February 29, 2012

Cooking With Cricut Challenge: Carnival

Happy Wednesday and welcome to challenge day at Cooking With Cricut!  Our challenge theme this week was chosen by my fellow teammates, Yolie and Celeste.  And that challenge was to use carnival elements to create a carnival or carnival birthday project.

I decided to create a 12" x 12" scrapbook layout using photos I took at my daughter's school carnival last Fall. 


The inspiration for my layout is from one made by Amber at The Lilypad.  This is a far cry from my normal style and color palette -- but it was fun stepping outside of my comfort zone to create something different for my daughter's scrapbook. 

Here is the recipe:
  • Scalloped border --Plantin SchoolBook, pg. 70.  I welded three sections together to make the border edge on my teal mat.  It measures 1/2" tall by 10 1/4" long.  Paper is from my scrap stash.
  • Text -- Plantin SchoolBook.  Roly Poly font feature + shift (for lower case letters).  Cut at 1" tall from black Recollections card stock.
  • Award -- Plantin SchoolBook, pg. 77; roly poly font feature + shift.  I cut this three times in different sizes (2 1/2" tall, 2" tall and 1 1/2" tall) and then trimmed the ribbon tails off.  I curled the edges using a toothpick, layered the three pieces and connected them with a silver brad (The Paper Studio).  I added some grosgrain ribbon tails for texture and dimension.  The paper used from bottom to top is:  Imaginisce, Bazzill Kachina and white card stock.
  • Ticket -- Mickey Font, pg. 123.  Cut at 2" wide from white card stock.


  • Ferris Wheel -- PaperCraftingWorld.com, "Carnival of Fun" cutting file.  I cut this using my new SCAL program at 3 3/4" tall by 4" wide.  The papers are:  white card stock, Bazzill Kachina, Imagnisce, and orange plaid (scrap stash).  The gear eyelet is from the Spare Parts collection by The Paper Studio.
  • Cotton Candy & Corn Dogs -- PaperCraftingWorld.com, "Carnival of Fun" cutting file.  Cut at 3" tall by 3 1/4" wide -- all papers are from my scrap stash.


  • The silver brads and spiral paper clip are also from the Spare Parts collection by The Paper Studio.
  • The journaling box and sub-title box were created in Microsoft Publisher and then printed out and cut.
  • I edited my photos in Adobe Photoshop Elements Editor -- cropping, resizing and converting to black and white.  I really wanted my photos to look like they were from a photo booth often found at carnivals.
  • The tickets and other decorative paper are from a 12" x 12" sheet by Imaginisce, #10511 14448 that I found at my local Michaels.  It has great carnival elements on one side and a stripe on the reverse.
  • My base sheet was a 12" x 12" Bazzil card stock called "Red Rock" #T2-229.  The mat is also a Bazzil card stock -- called "Kachina" #T5-5113.
Now it's your turn!  Head on over to Cooking With Cricut and link up your carnival themed project!  Make sure  you check out the great projects from the Design Team while  you're there.  We're saying farewell to ten Design Team members today -- it has been a great term with these fantastic designers and we'll miss them!  Next Wednesday, March 7, we will welcome SIXTEEN new Designers and welcome back THIRTEEN returning Designers.  It's going to be a blast -- don't miss it!

~ Jen

Wednesday, February 22, 2012

Cooking With Cricut Challenge: Birthday!


Good morning, crafty friends!  Today is challenge day at Cooking With Cricut and this week's hostesses have given the Design Team a fun one.  Our focus this week is all things birthday -- you must include cake, cupcakes and/or balloons in your project.  I hope you'll go over and check out all the fun things the Team made and link up your own birthday treat, too!

I am in the midst of packing boxes and moving . . . but I'll be back up and running soon!  Have a wonderful, crafty week!

~ Jen

Monday, February 20, 2012

Going Bananas!

Yep.  It has finally happened . . . I've gone bananas!  Of course some of you are saying that happened looooonnnngggg ago!  LOL!  But seriously . . . one of our sweet nephews turned one on Valentine's Day and his parents wanted a monkey themed birthday party. Which is appropriate -- his mommy always calls him her "little monkey."  So to celebrate all things "monkey"  Melin and I have teamed up over at CookingWithCricut.com to bring you our "Monkey Monday" Showcase.  So make sure you pop over and see the cute layout and card she created!

Can you believe that Cricut has seventeen cartridges with monkey images on them!  That is a full barrel of monkeys to choose from!  I used the monkeys from Create-A-Critter, New Arrival and ZooBalloo for the party decorations and cake.

First up is the banner -- here's the recipe:


  • Pennants cut at 5 1/2" tall x 4 1/4" wide using the Girl's Make-Up Party cartridge.  The paper is Bazzill's Petty Cask and two shades of blue by Recollections.
  • Pennant mats are cut at 4 3/4" tall x 3 1/2" wide using the Girl's Make-Up Party cartridge.  The paper is by The Paper Studio - 12x12 Basics paper pad.
  • Text is 4" tall from white card stock using the Cake Basics cartridge.
  • Monkeys are made using Bazzill's Iced Cocoa and Carob card stocks and ZooBalloo (4 1/4" tall), Create-A-Critter (3 3/4" tall) and New Arrival (4" tall).
  • The vines are from Create-A-Critter cut at 1" tall x 3" wide using Bazzill's Petty Cash card stock.


These little monkeys will serve a dual purpose -- not only are the decorations for the party, but afterward Brayden's mommy is going to hang them in his room.


  • The curved vines were cut at 11 1/2" wide from Bazzill's Lily Pond and Guacamole card stock using the Create-A-Critter cartridge.
  • The long vines were cut at 11 1/2" (same paper and cartridge).
  • All of the monkeys were cut from Create-A-Critter using Bazzill's Iced Cocoa and Carob card stocks.  The large monkey measures 8" wide by 9 1/4" tall.  The two smaller monkeys are 7" wide by 8 1/4" tall.


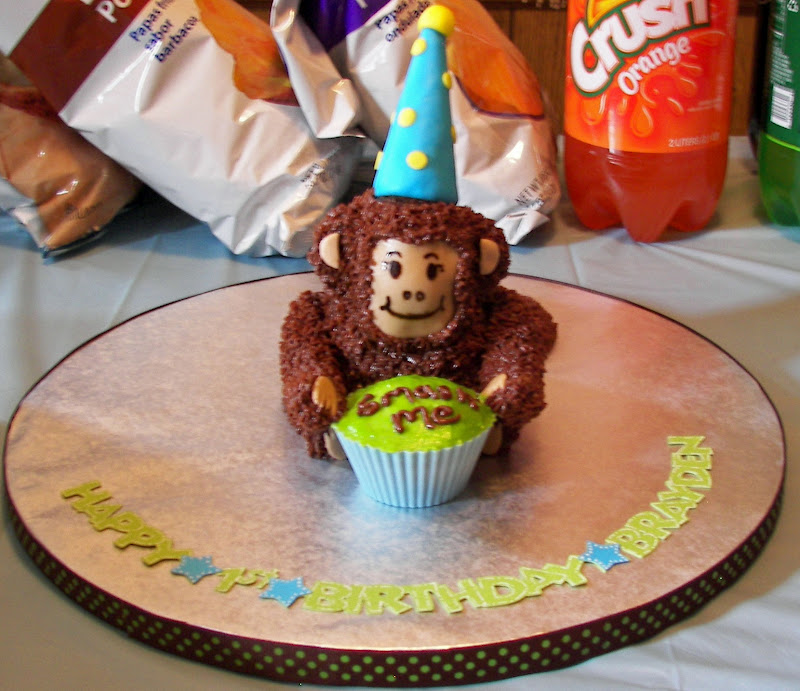
And it wouldn't be a party without one of Dee's amazing cakes!  This is quite possibly the cutest "Smash" Cake she has made for one of the babies!!


She used the Wilton 3-D Mini Bear pan to create this little monkey.  It is chocolate cake with chocolate buttercream.  The arms, legs and tail are sculpted from fondant and then covered with buttercream.  His face and paw pads are also from fondant and his face was painted on using Wilton gel colors.  The party hat was made by covering an ice cream cone with fondant.  I made the "cake ring" using Bazzill's Petty Cash card stock and one of the blue card stocks by Recollections.  It measures approximately 12" wide and is 1 1/4" tall.  I used Mickey Font for the text and the stars are from the Plantin SchoolBook cartrdge. 

Then we broke out our Cricut Cake machine and I went to work creating the decorations for the 1/2 sheet cake that Dee made and iced.  The cake is funfetti and the icing is buttercream.  All of the decorations, except for the border, are made from fondant.


  • Palm Tree:  Cut using the Create-A-Critter cartridge at 10" high by 6 1/2" wide. 
  • Monkey on right:  3 3/4" high using the ZooBalloo cartridge.
  • Monkey on left:  3" high using Create-A-Critter.
  • Grass: 11/2" tall by 13" wide (two sections welded) from ZooBalloo.
  • Vines:  3" tall by 13" wide from ZooBalloo.
  • Party Hats:  ZooBalloo cartridge, cut at 1 1/2" tall.
  • Text:  Mickey Font, cut at 1 1/8" tall.
  • Details were painted on using Wilton gel color.
The birthday boy loved all the monkeys -- so did his mommy!  And the cake was super yummy!!


Thanks for joining me today for our "Monkey Monday!"  Make sure you head over to CookingWithCricut.com and see what kind of monkey business Melin has been up to!  And then check back in on Tuesday to see what the Paper Crafting World girls are up to and Wednesday for our weekly Cooking With Cricut challenge.

~ Jen